Cloud Computing Projekt
Raspberry Pi Cluster mit KI-basierter Objekterkennung, MPI und Monitoring
AI Model & Object Recognition
Table of Contents
- Foreword
- Model & Training
- YOLO 11n Deployment on IMX500 AI Camera (Raspberry Pi Setup)
- YOLO 11n Deployment on Pi AI Hat+ with Hailo-8 Accelerator
- Integrating the Telegram Bot
Foreword
Problem: The goal is to develop an edge computing system that detects potential threats such as theft, fire, or vandalism in real time. Detected events should be processed directly on the edge device and reported to backend and Telegram.
Goal: The system should provide accurate and real-time threat detection with a simple setup workflow.
Requirements:
- Raspberry Pi 4 with Sony IMX500 AI Camera, or Raspberry Pi 5 with AI HAT+
- Suitable power supply and camera hardware
- GPU-accelerated environment for model training, e.g., Google Colab or a dedicated PC
- Sufficient and representative training data
- Ultralytics YOLO for model training and inference
Why two hardware platforms? Two AI platforms are used to compare different approaches to edge inference:
- Pi4 + IMX AI Camera: AI inference is performed directly on the camera’s integrated AI hardware.
- Pi5 + AI HAT+: AI inference is sped up by the Hailo accelerator. Using two platforms allows the comparison of deployment complexity for different edge computing modules.
Why YOLO? Yolo was selected because it provides simple interfaces for training, evaluating, and deploying object detection models. The Ultralytics framework supports custom datasets and export formats required by the target platforms. Other alternatives were: TensorFlow, OpenCV.
Overall, this manual describes the configuration and setup of an AI-powered detection system based on YOLOv11n (Nano variant). The system architecture looks as follows.
flowchart TB
    dataset[Dataset] --> train[YOLO11n Train]
    train -->|Trained Model| hailo[".hef<br/>Hailo-8"]
    train -->|Trained Model| imx["packerOut.zip<br/>IMX500"]

    hailo --> pi5["Raspberry Pi 5<br/>+ AI HAT+"]
    imx --> pi4["Raspberry Pi 4<br/>+ AI Camera"]

    pi5 --> detection[Object Detection]
    pi4 --> detection
    detection --> threshold[Confidence Threshold]
    threshold --> threat[Threat Detected]
    threat --> backend[Backend]
    threat --> telegram[Telegram]
Model & Training
In the first step, we created a custom dataset and used it to train and evaluate a yolov11n model. The training data was labeled using the software Roboflow, and the following labels were used:
| Class | Examples | Scenario |
|---|---|---|
Fire |
Lighter | Fire hazard |
Mask |
FFP2 mask, balaclava | Theft |
Scissors |
Kitchen scissors, craft scissors | Vandalism |
Knife |
Kitchen knife, pocket knife, utility knife | Vandalism |
After further tests, based on the results, additional public datasets were incorporated to increase the variety of training data and ambiguous classes were removed to improve the consistency of the final model. But the following section describes the general process used to create, annotate, preprocess, and prepare own datasets for YOLO training.
Creating the Dataset
- Record videos of the objects
- Capture multiple 10-second-clips of the example objects from different angles, various backgrounds, and under different lighting.
- Roboflow login
- Create a Roboflow account and log in
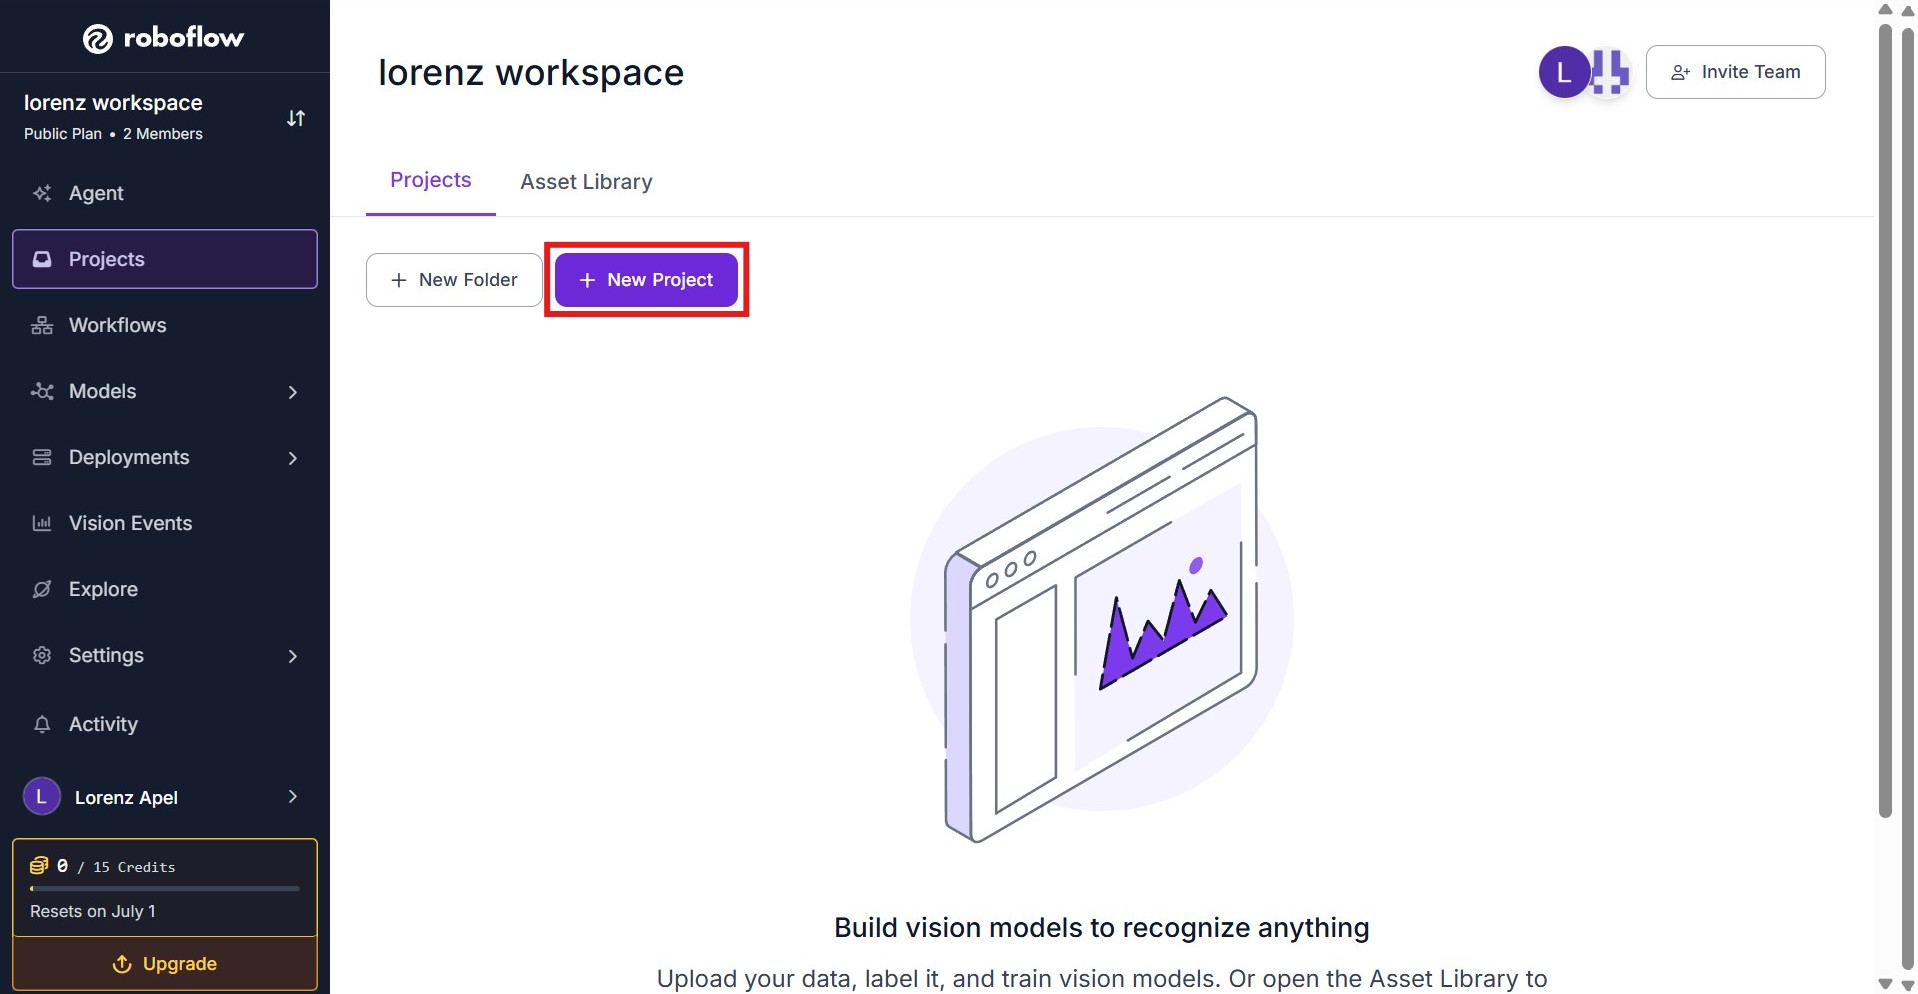
- Create a new project
-
Under the “Projects” tab, create a new project in your workspace.
-
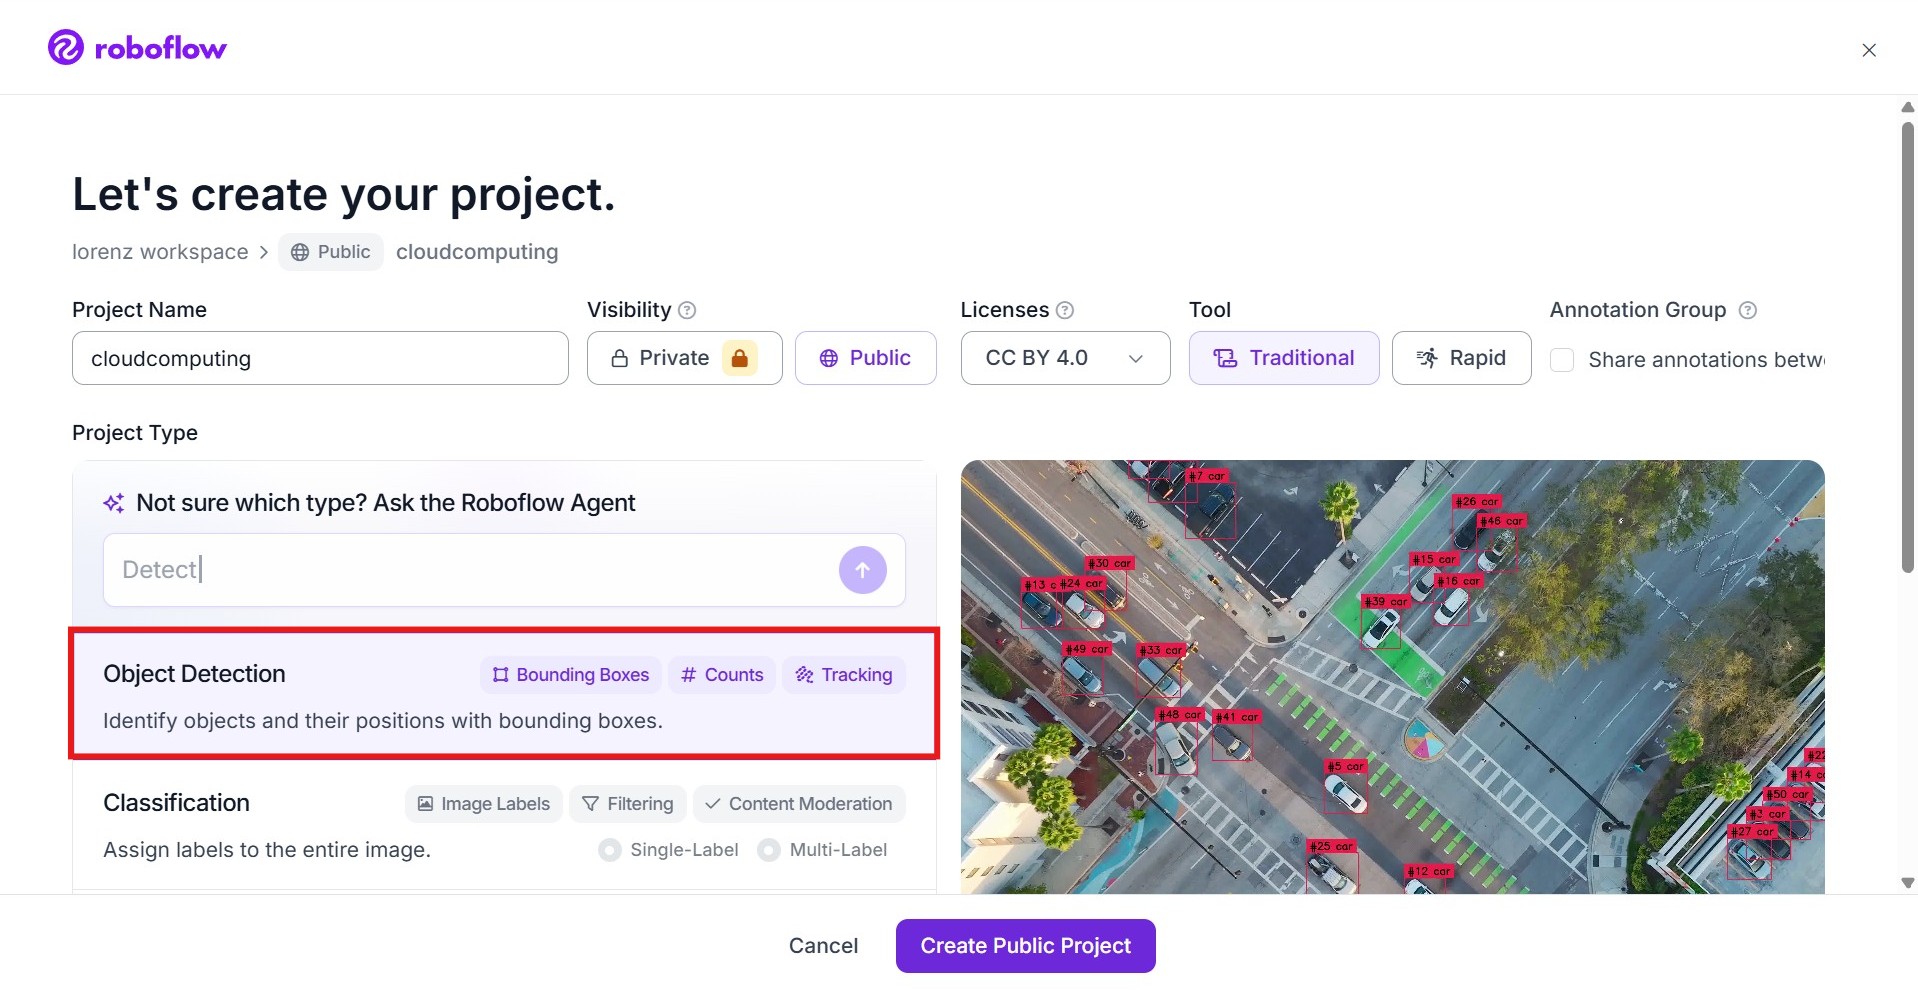
In the project configuration, select the project type (Object Detection).
-
- Create Classes
- In this project, the classes can be added under the “Classes & Tags” tab.
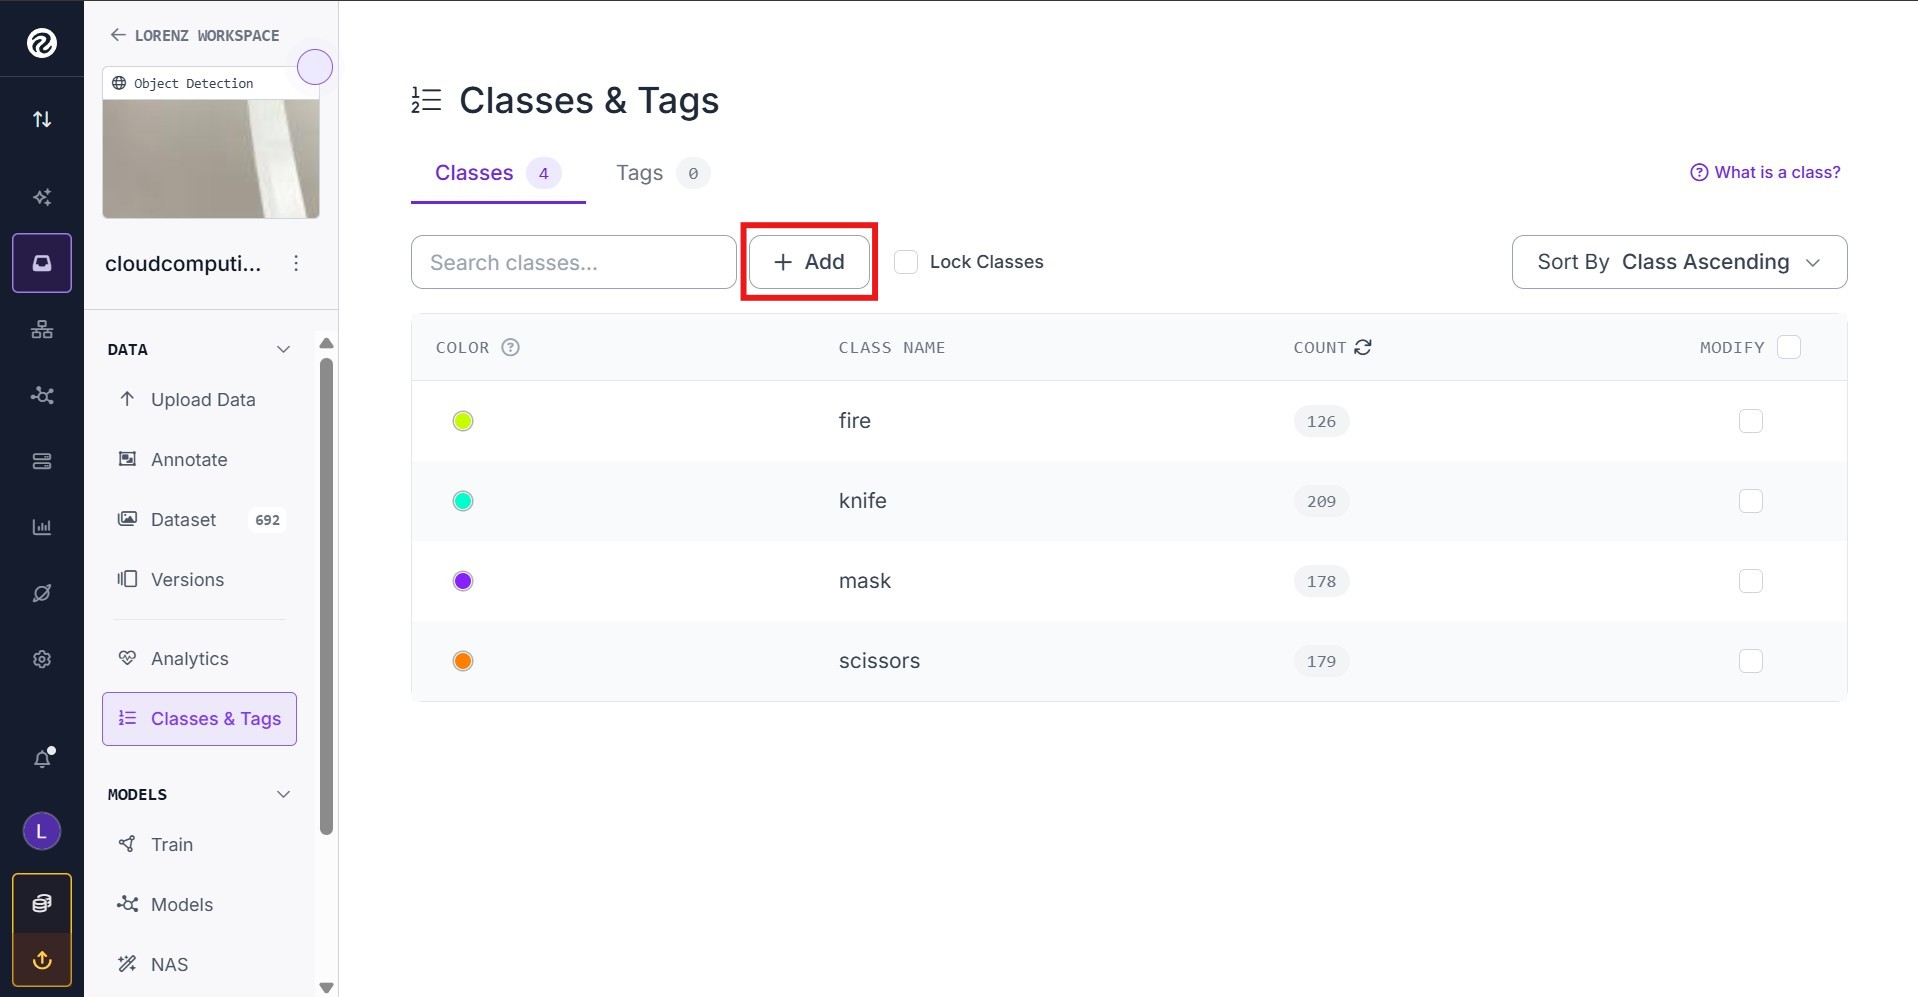
- In this project, the classes can be added under the “Classes & Tags” tab.
- Upload the videos and perform manual labeling
-
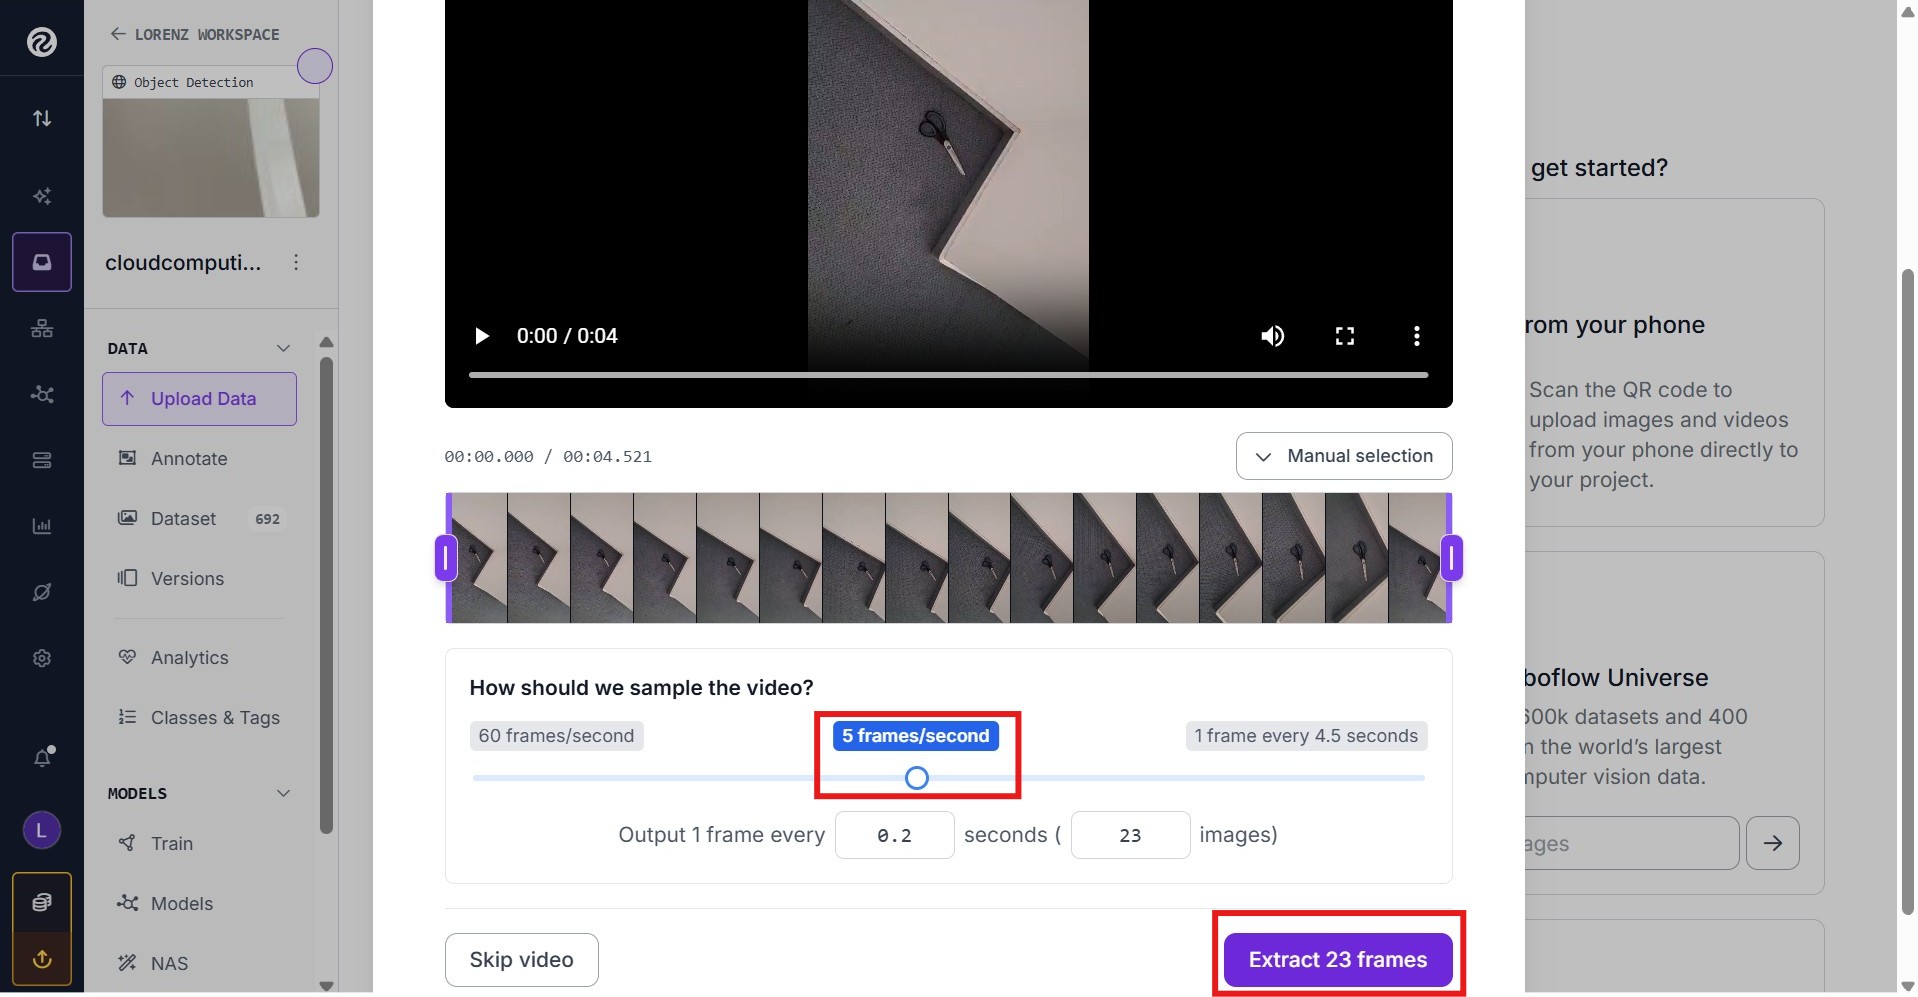
Under the “Upload Data” tab, the self-recorded clips can be uploaded. During this process, settings for frame extraction, such as the number of frames extracted per second, can be configured.
-
The classes and the resulting labels can then be assigned to the objects using the tools provided by Roboflow.
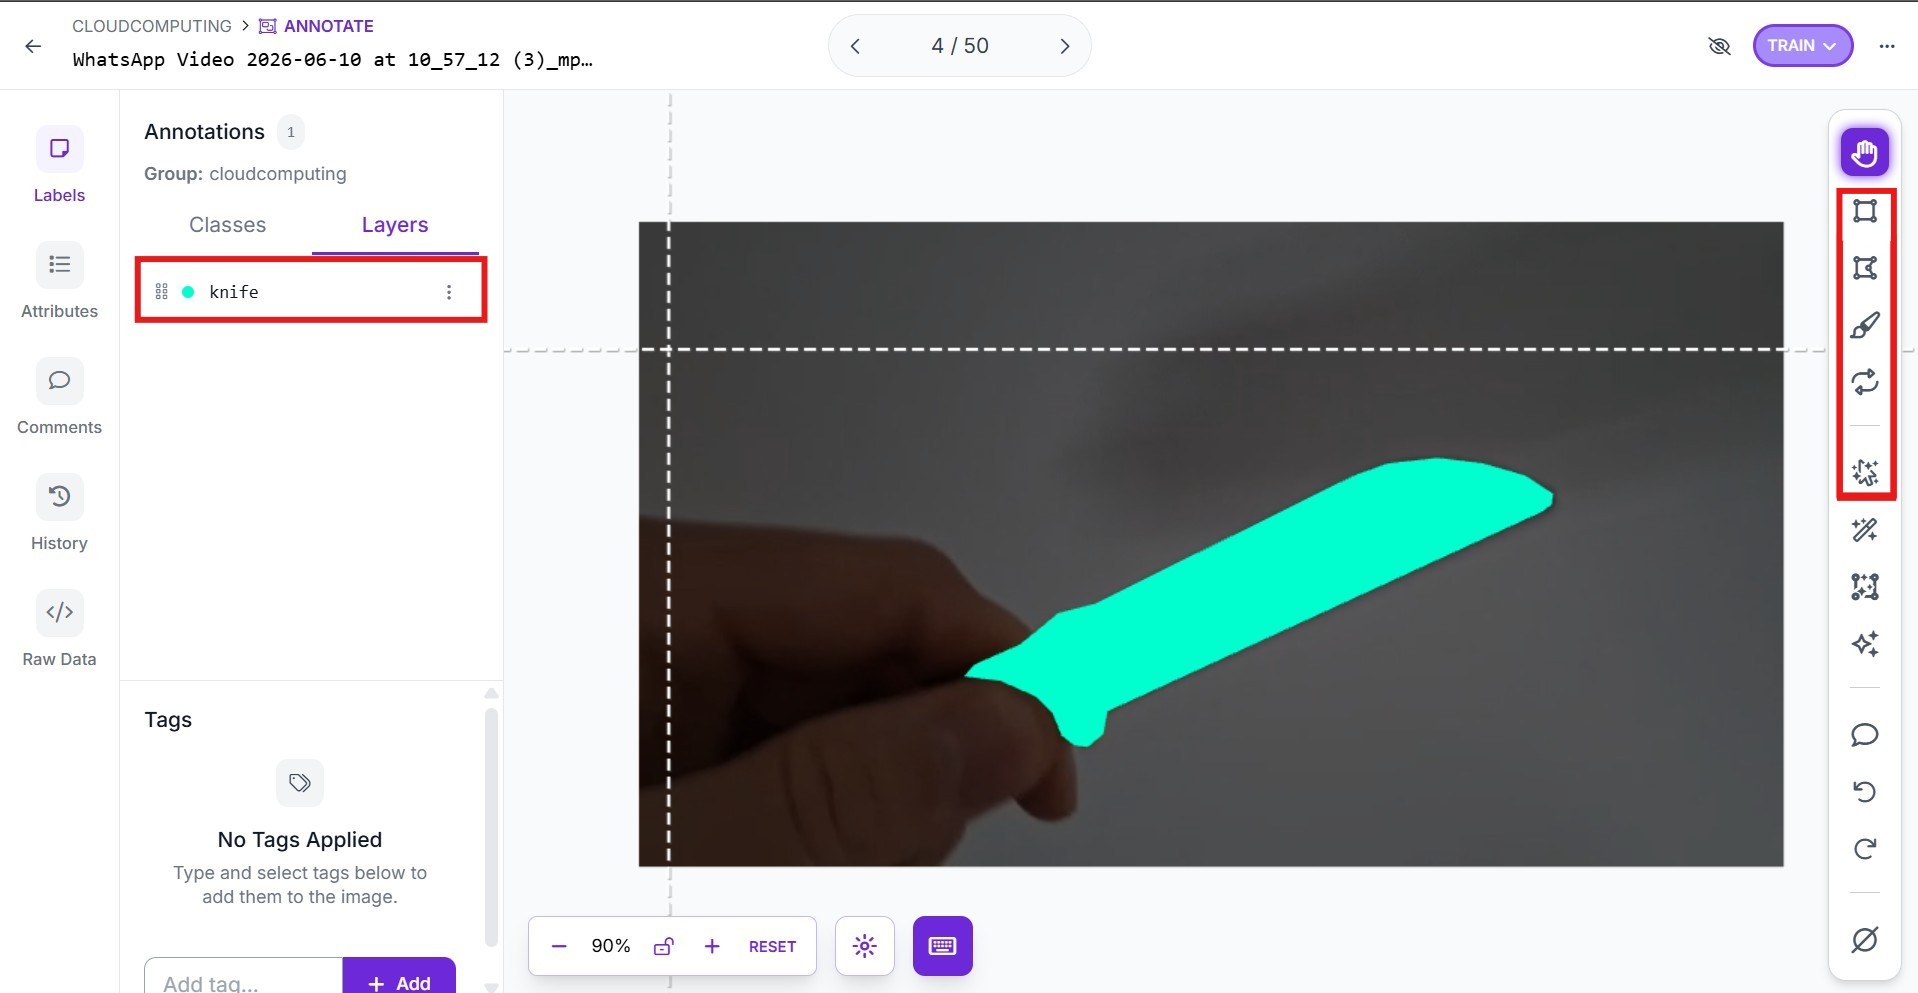
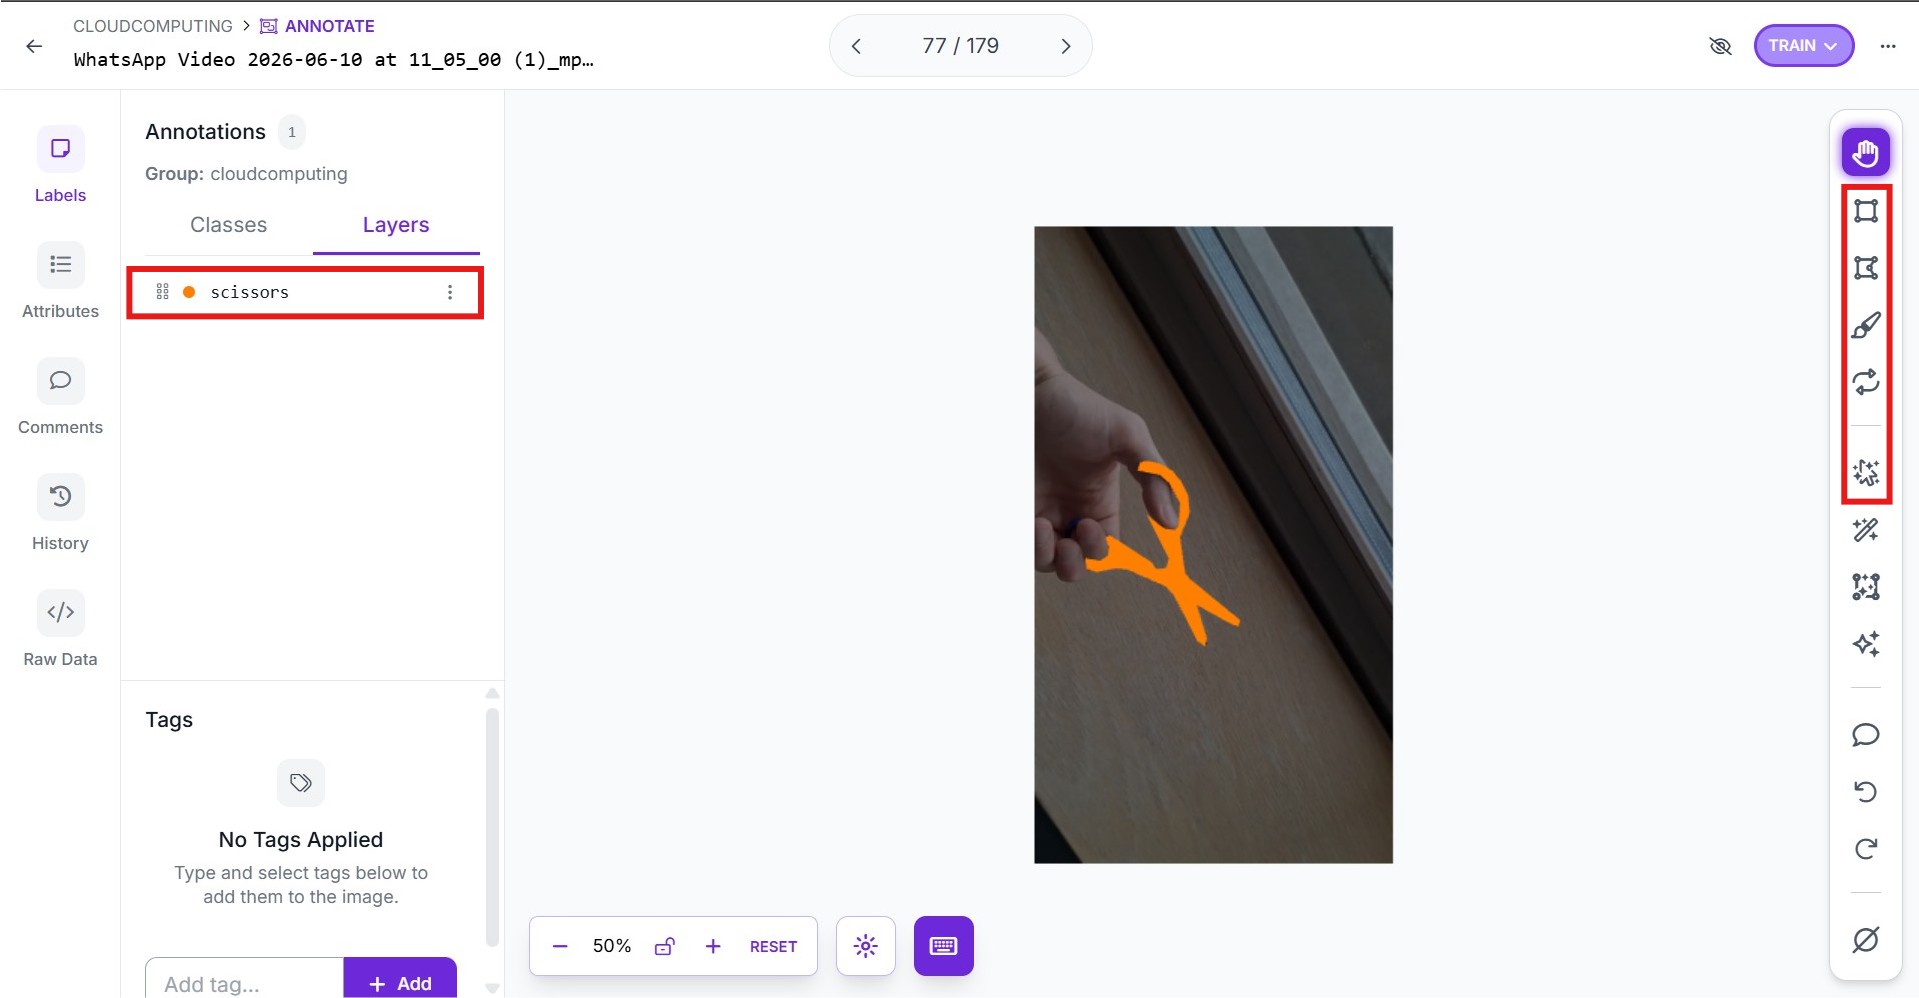
-
- Add the annotated images to the dataset
- The labeled images are then added to the final dataset in Roboflow, the test dataset contains 692 images.
- Dataset Split
- The complete dataset is then split into 70% training data, 15% validation data, and 15% test data.
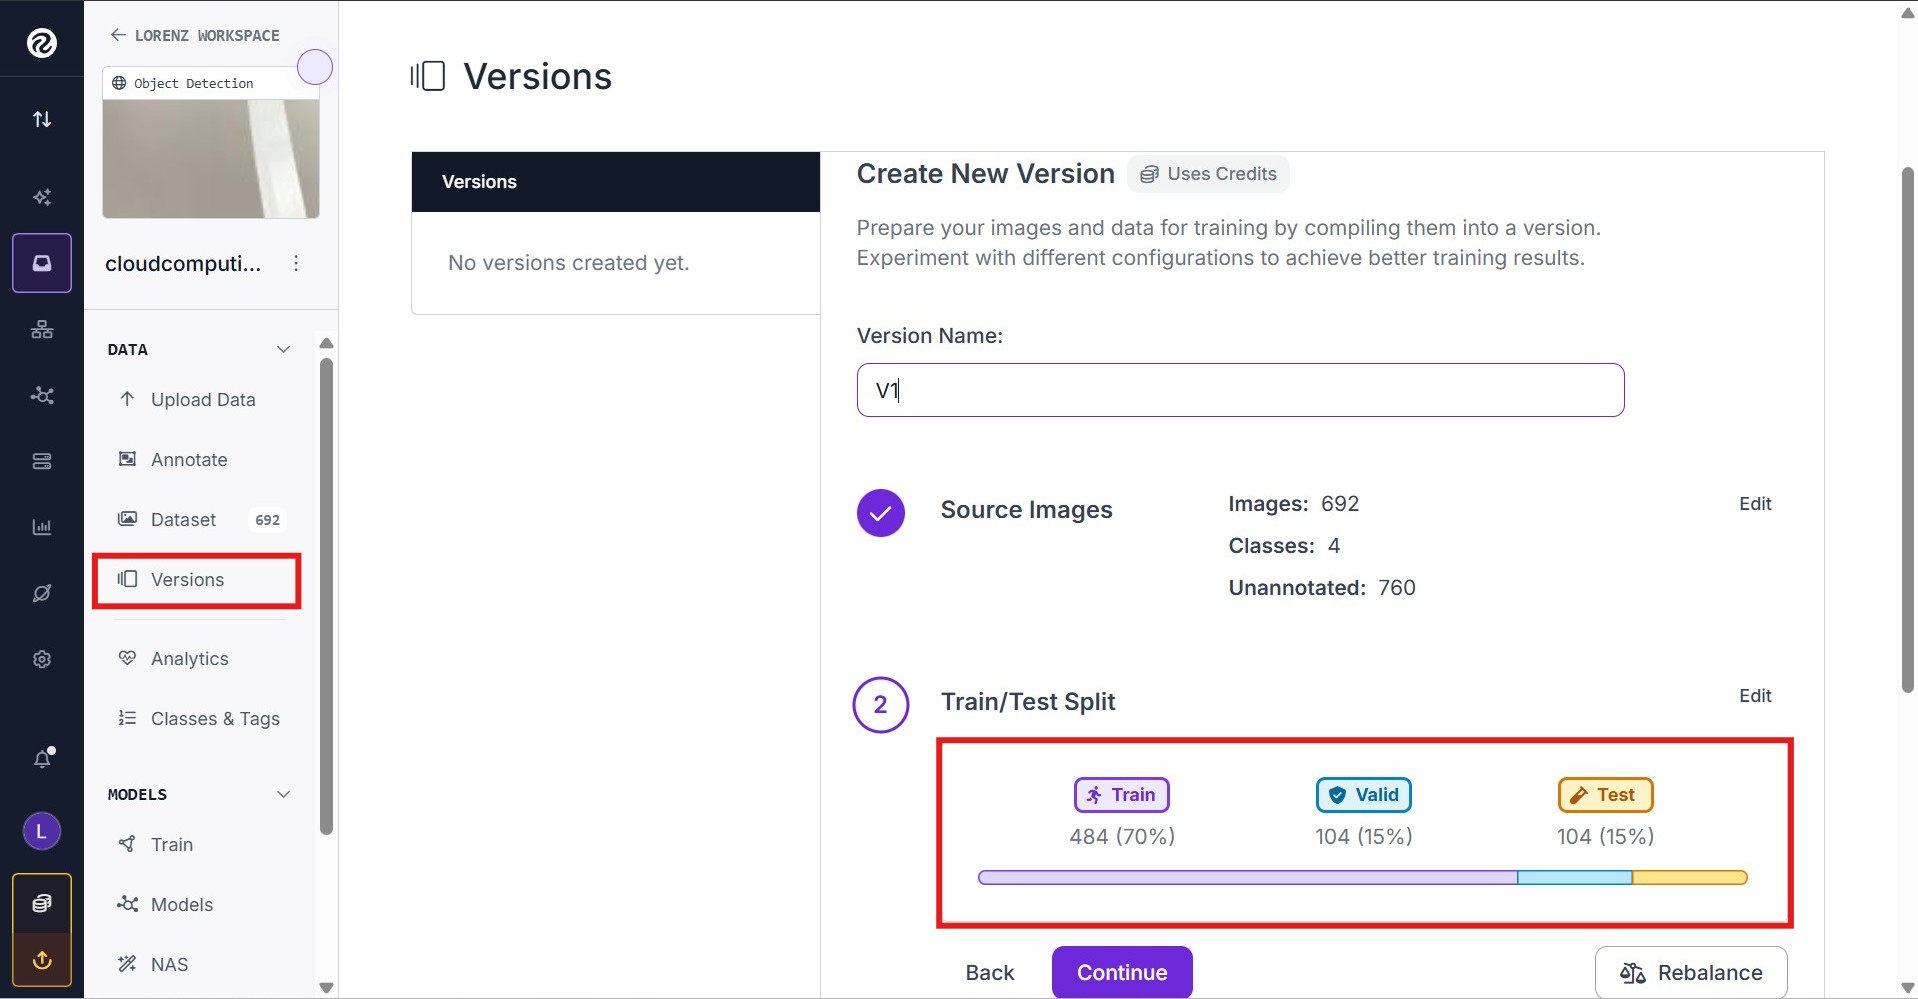
- The complete dataset is then split into 70% training data, 15% validation data, and 15% test data.
- Preprocessing
- To increase the size of the dataset, the preprocessing is adjusted:
- 90° Rotation
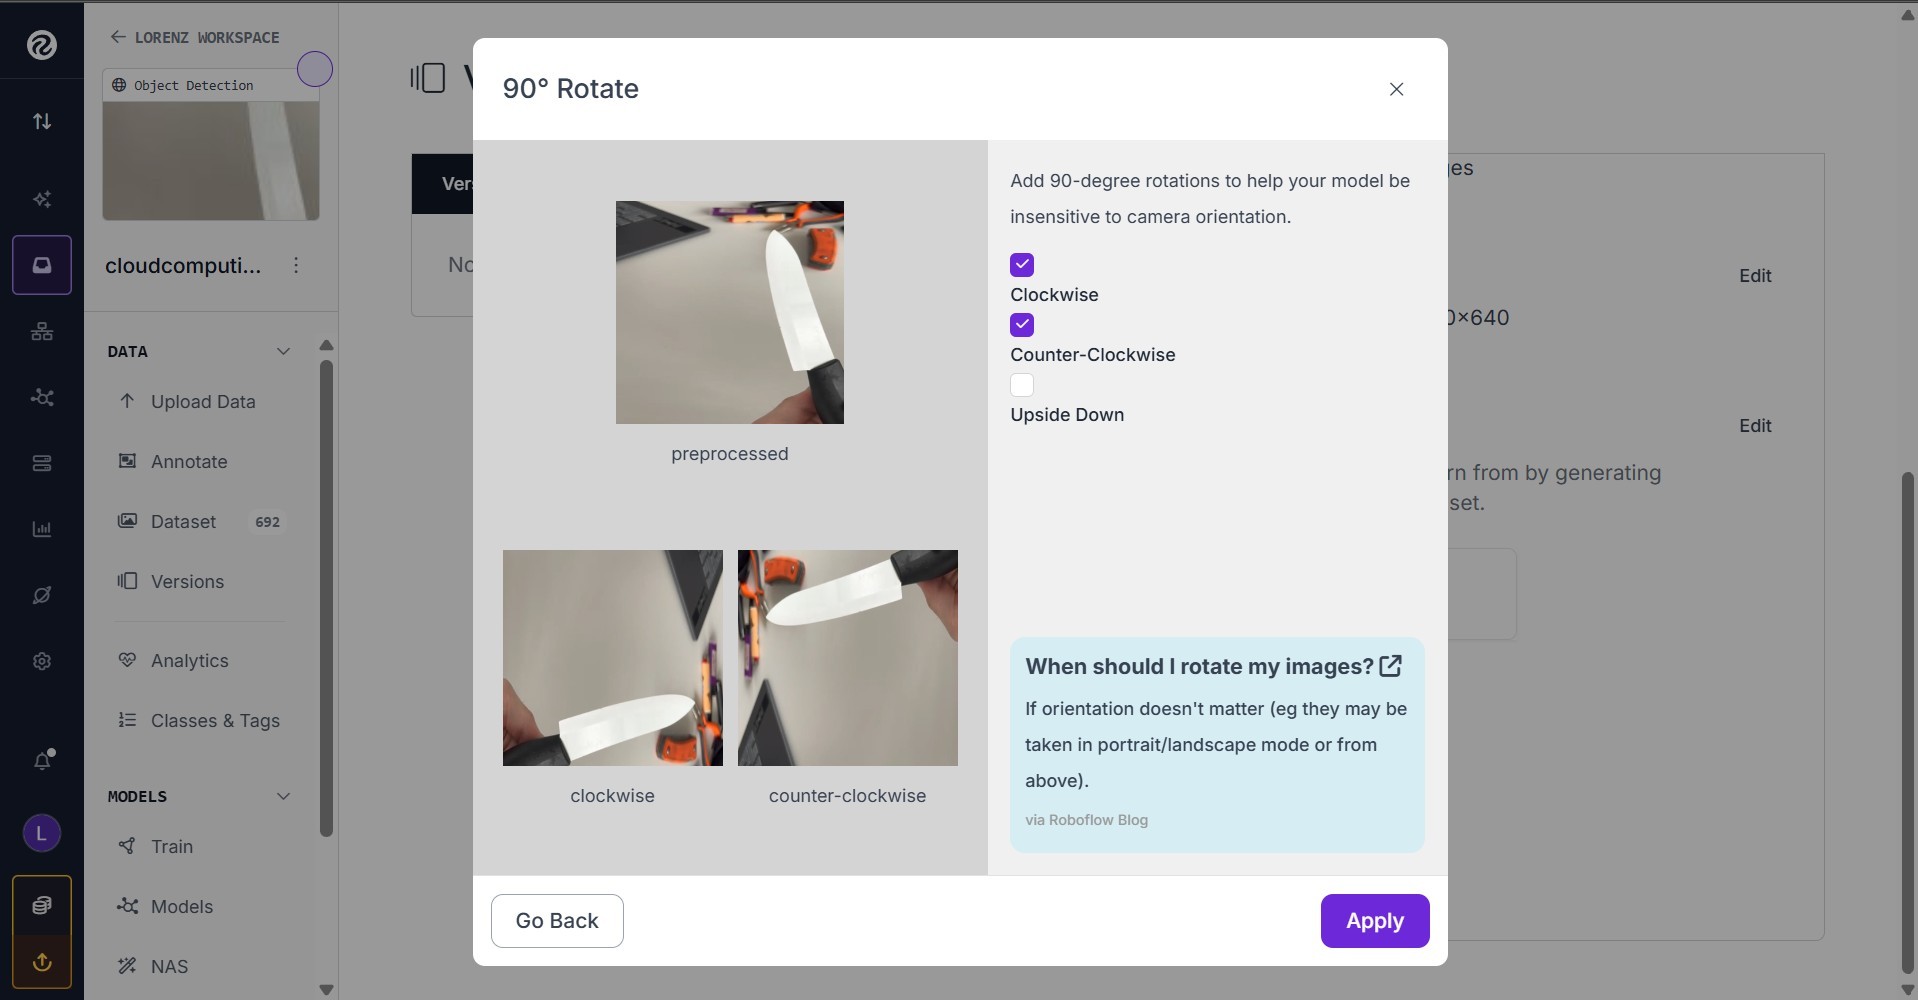
- Brightness 20% brighter or darker
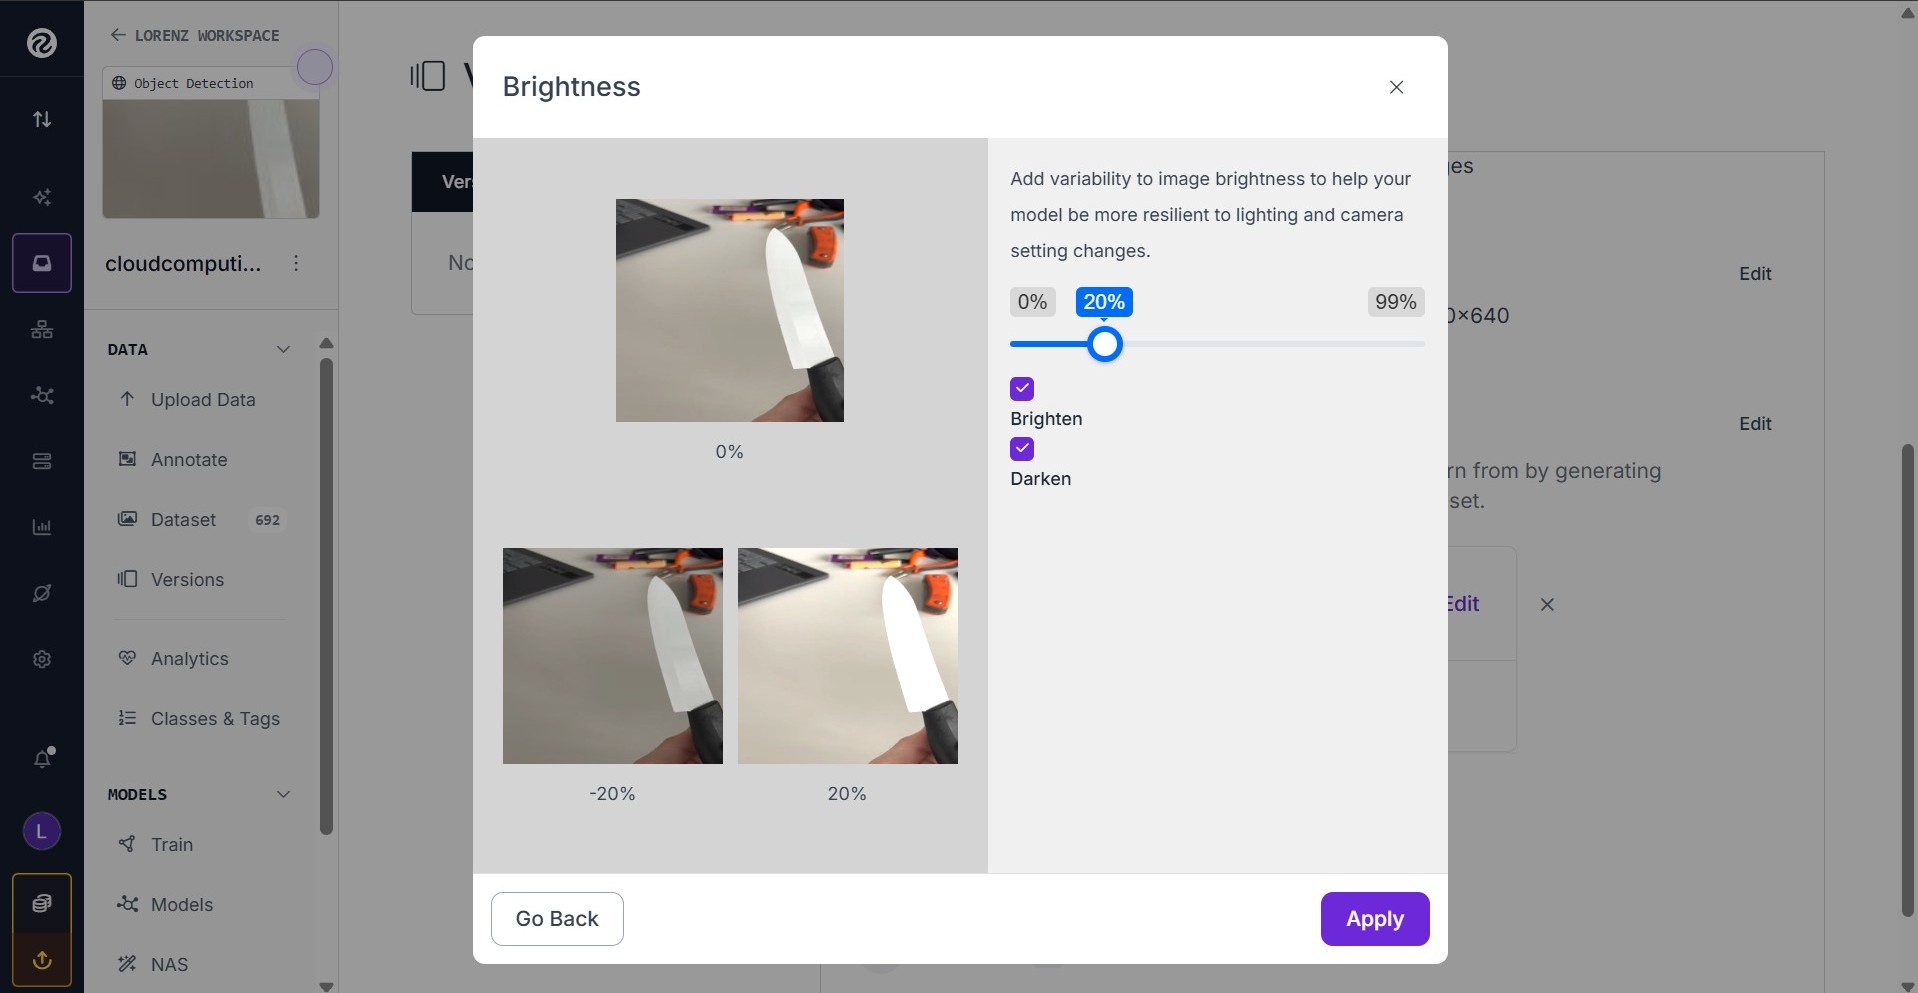
- imagesize stretched to 640x640
- Augmentation 2x
- 90° Rotation
- To increase the size of the dataset, the preprocessing is adjusted:
- Export in YOLO11 format in ZIP
- This dataset is then exported in the YOLO11 format.
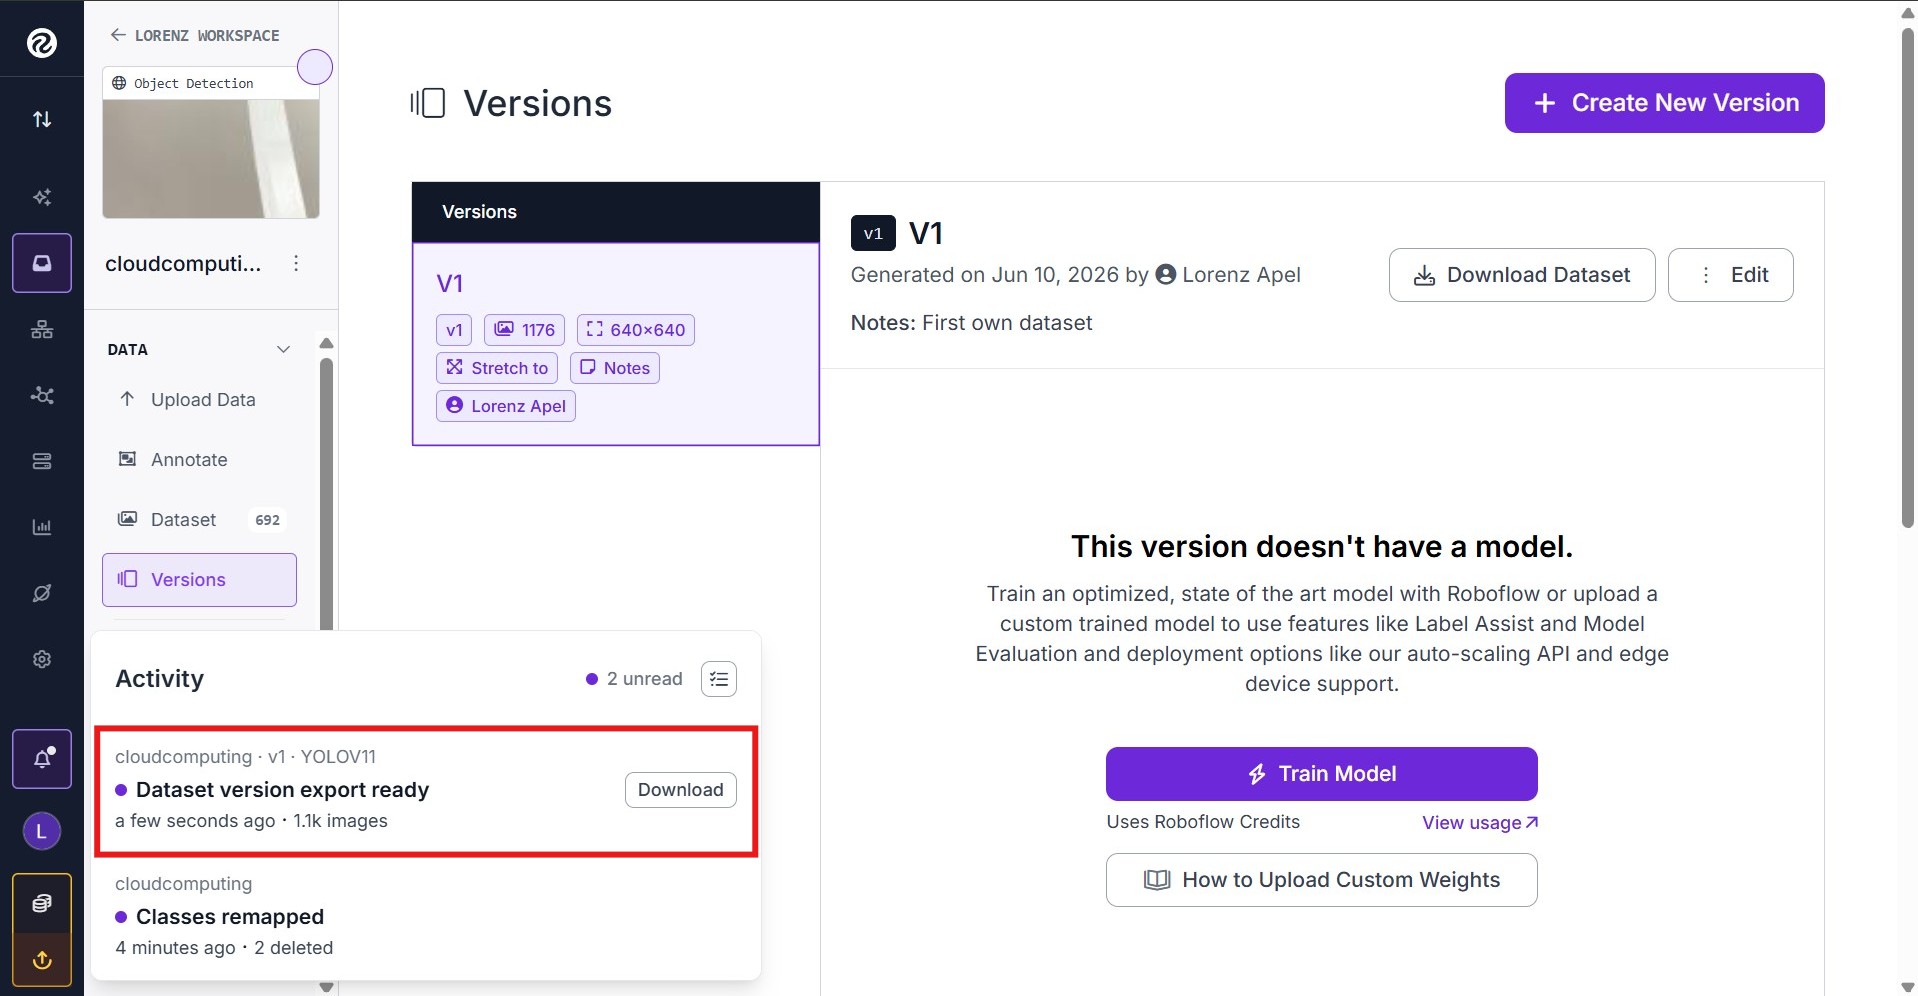
- This dataset is then exported in the YOLO11 format.
In total, we have 126 images with fire, 209 with knife, 176 with mask, and 179 with scissors. Those pictures represent a variety of perspectives, light situations, and backgrounds. They can be found here: https://app.roboflow.com/lorenz-workspace/cloudcomputing/browse?queryText=&pageSize=50&startingIndex=0&browseQuery=true
Integration of Public Datasets
In addition to the self-created dataset, several publicly available datasets were evaluated and partially incorporated to increase the variety and robustness of the training data.
For knife, scissors, gloves (used instead of masks), hammer, and baseball bat (for vandalism), the Open Images V7 dataset was used. This dataset provides images of a wide range of everyday objects against diverse backgrounds and from different viewing angles. These additional classes were evaluated as potential indicators of vandalism or theft.
To increase the variety of knife shapes, sizes, orientations, and viewing angles, the following dedicated datasets were used for the Knife class:
For the fire class, datasets were incorporated to provide additional examples of fire and smoke under different environmental conditions to reduce false negatives.
These additional datasets were merged with the self-created data, filtered for label containing images, and balanced.
YOLO11n Training
For the initial training run, we used the Ultralytics default training configuration, only adjusting the primary parameters: epochs, imgsize, batch, and patience. We adjusted the batch size to reduce training time and used patience for early stopping to limit overfitting.
These results were promising. The training losses (box_loss, cls_loss, and dfl_loss) decreased continuously. However, the validation losses were more irregular and contained several outliers, indicating a higher degree of variation in the validation data. Precision and recall improved continuously throughout training. After 60 epochs, the model achieved approximately 0.80 mAP50 and 0.50 mAP50-95.
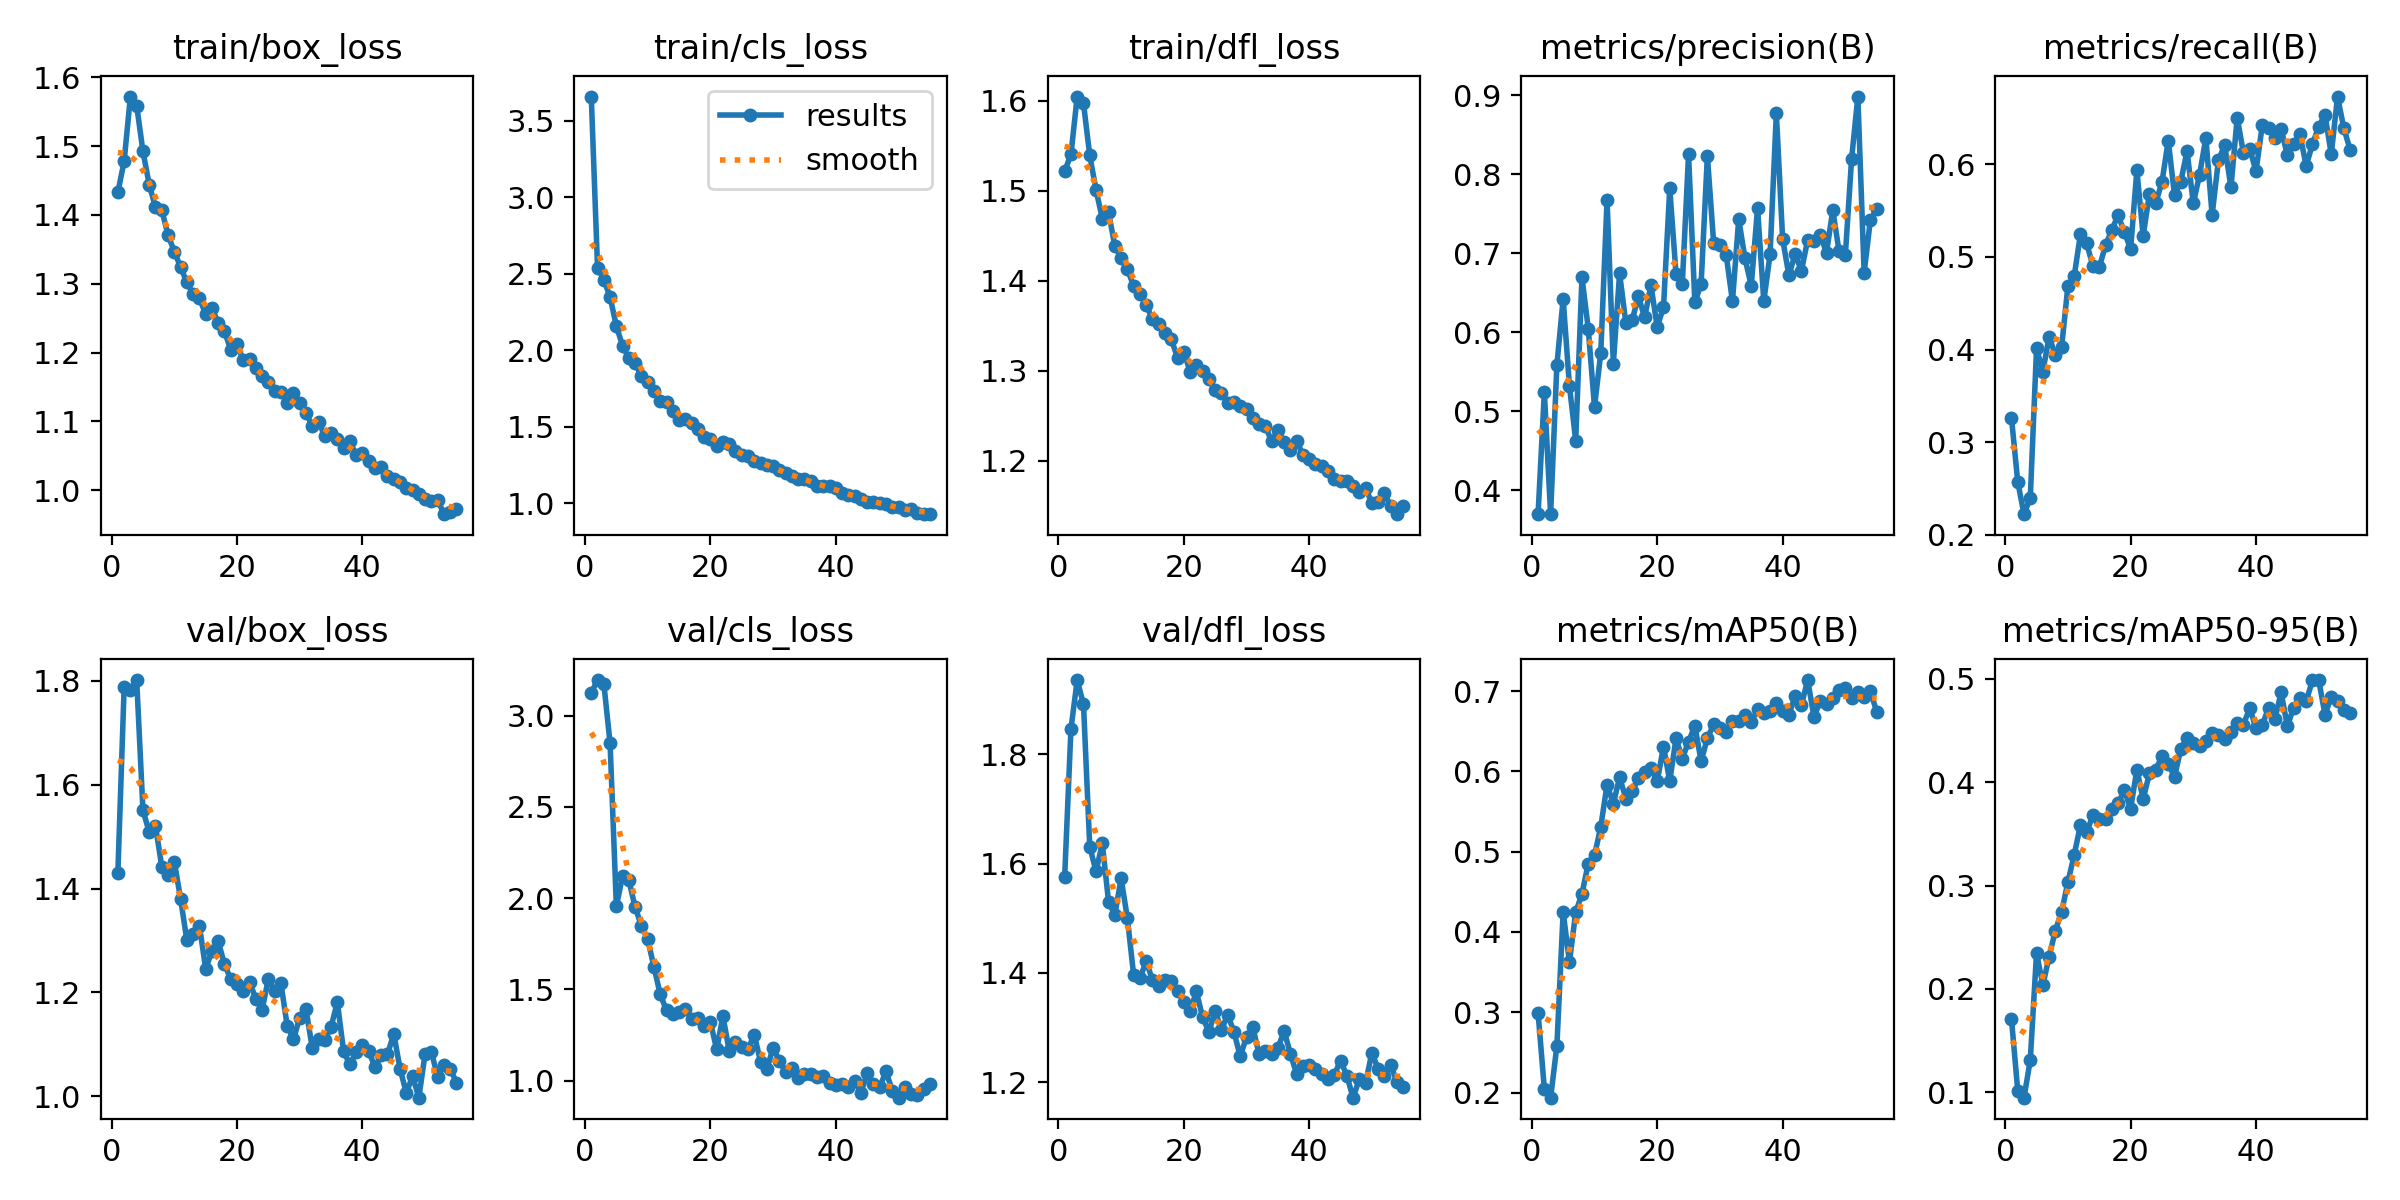
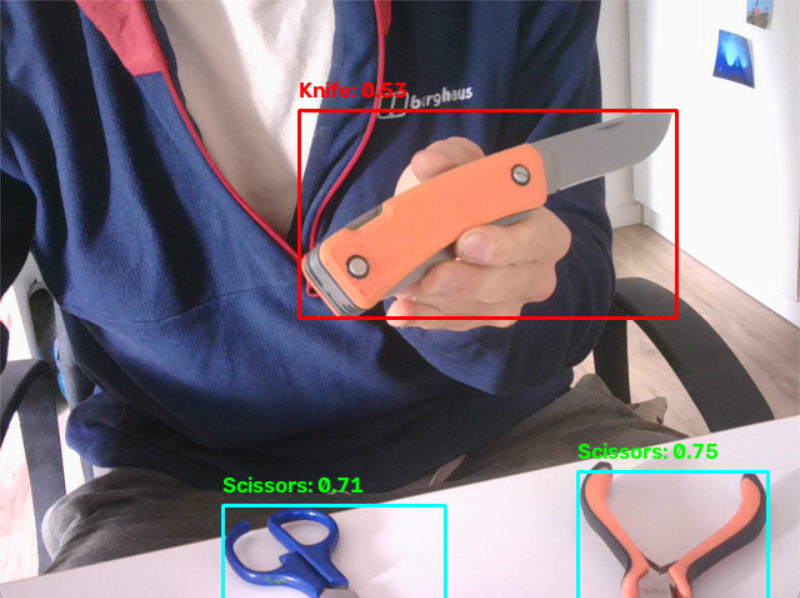
For comparison, the standard YOLO11n model achieves approximately 0.517 mAP50-95 on the COCO dataset. However, this comparison should be treated with caution, as the COCO dataset and our custom dataset differ significantly in terms of size, class distribution, and difficulty. During testing, we observed that the viewing angle significantly influenced detection performance. For instance, knives viewed from the side were reliably detected, whereas front-facing knives were detected less consistently. The following images show this effect on model confidence when the knife is rotated.
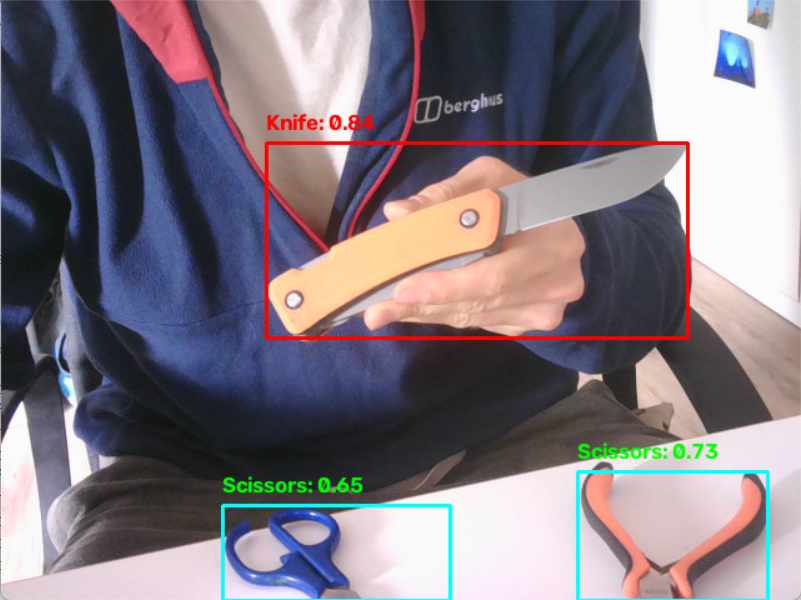
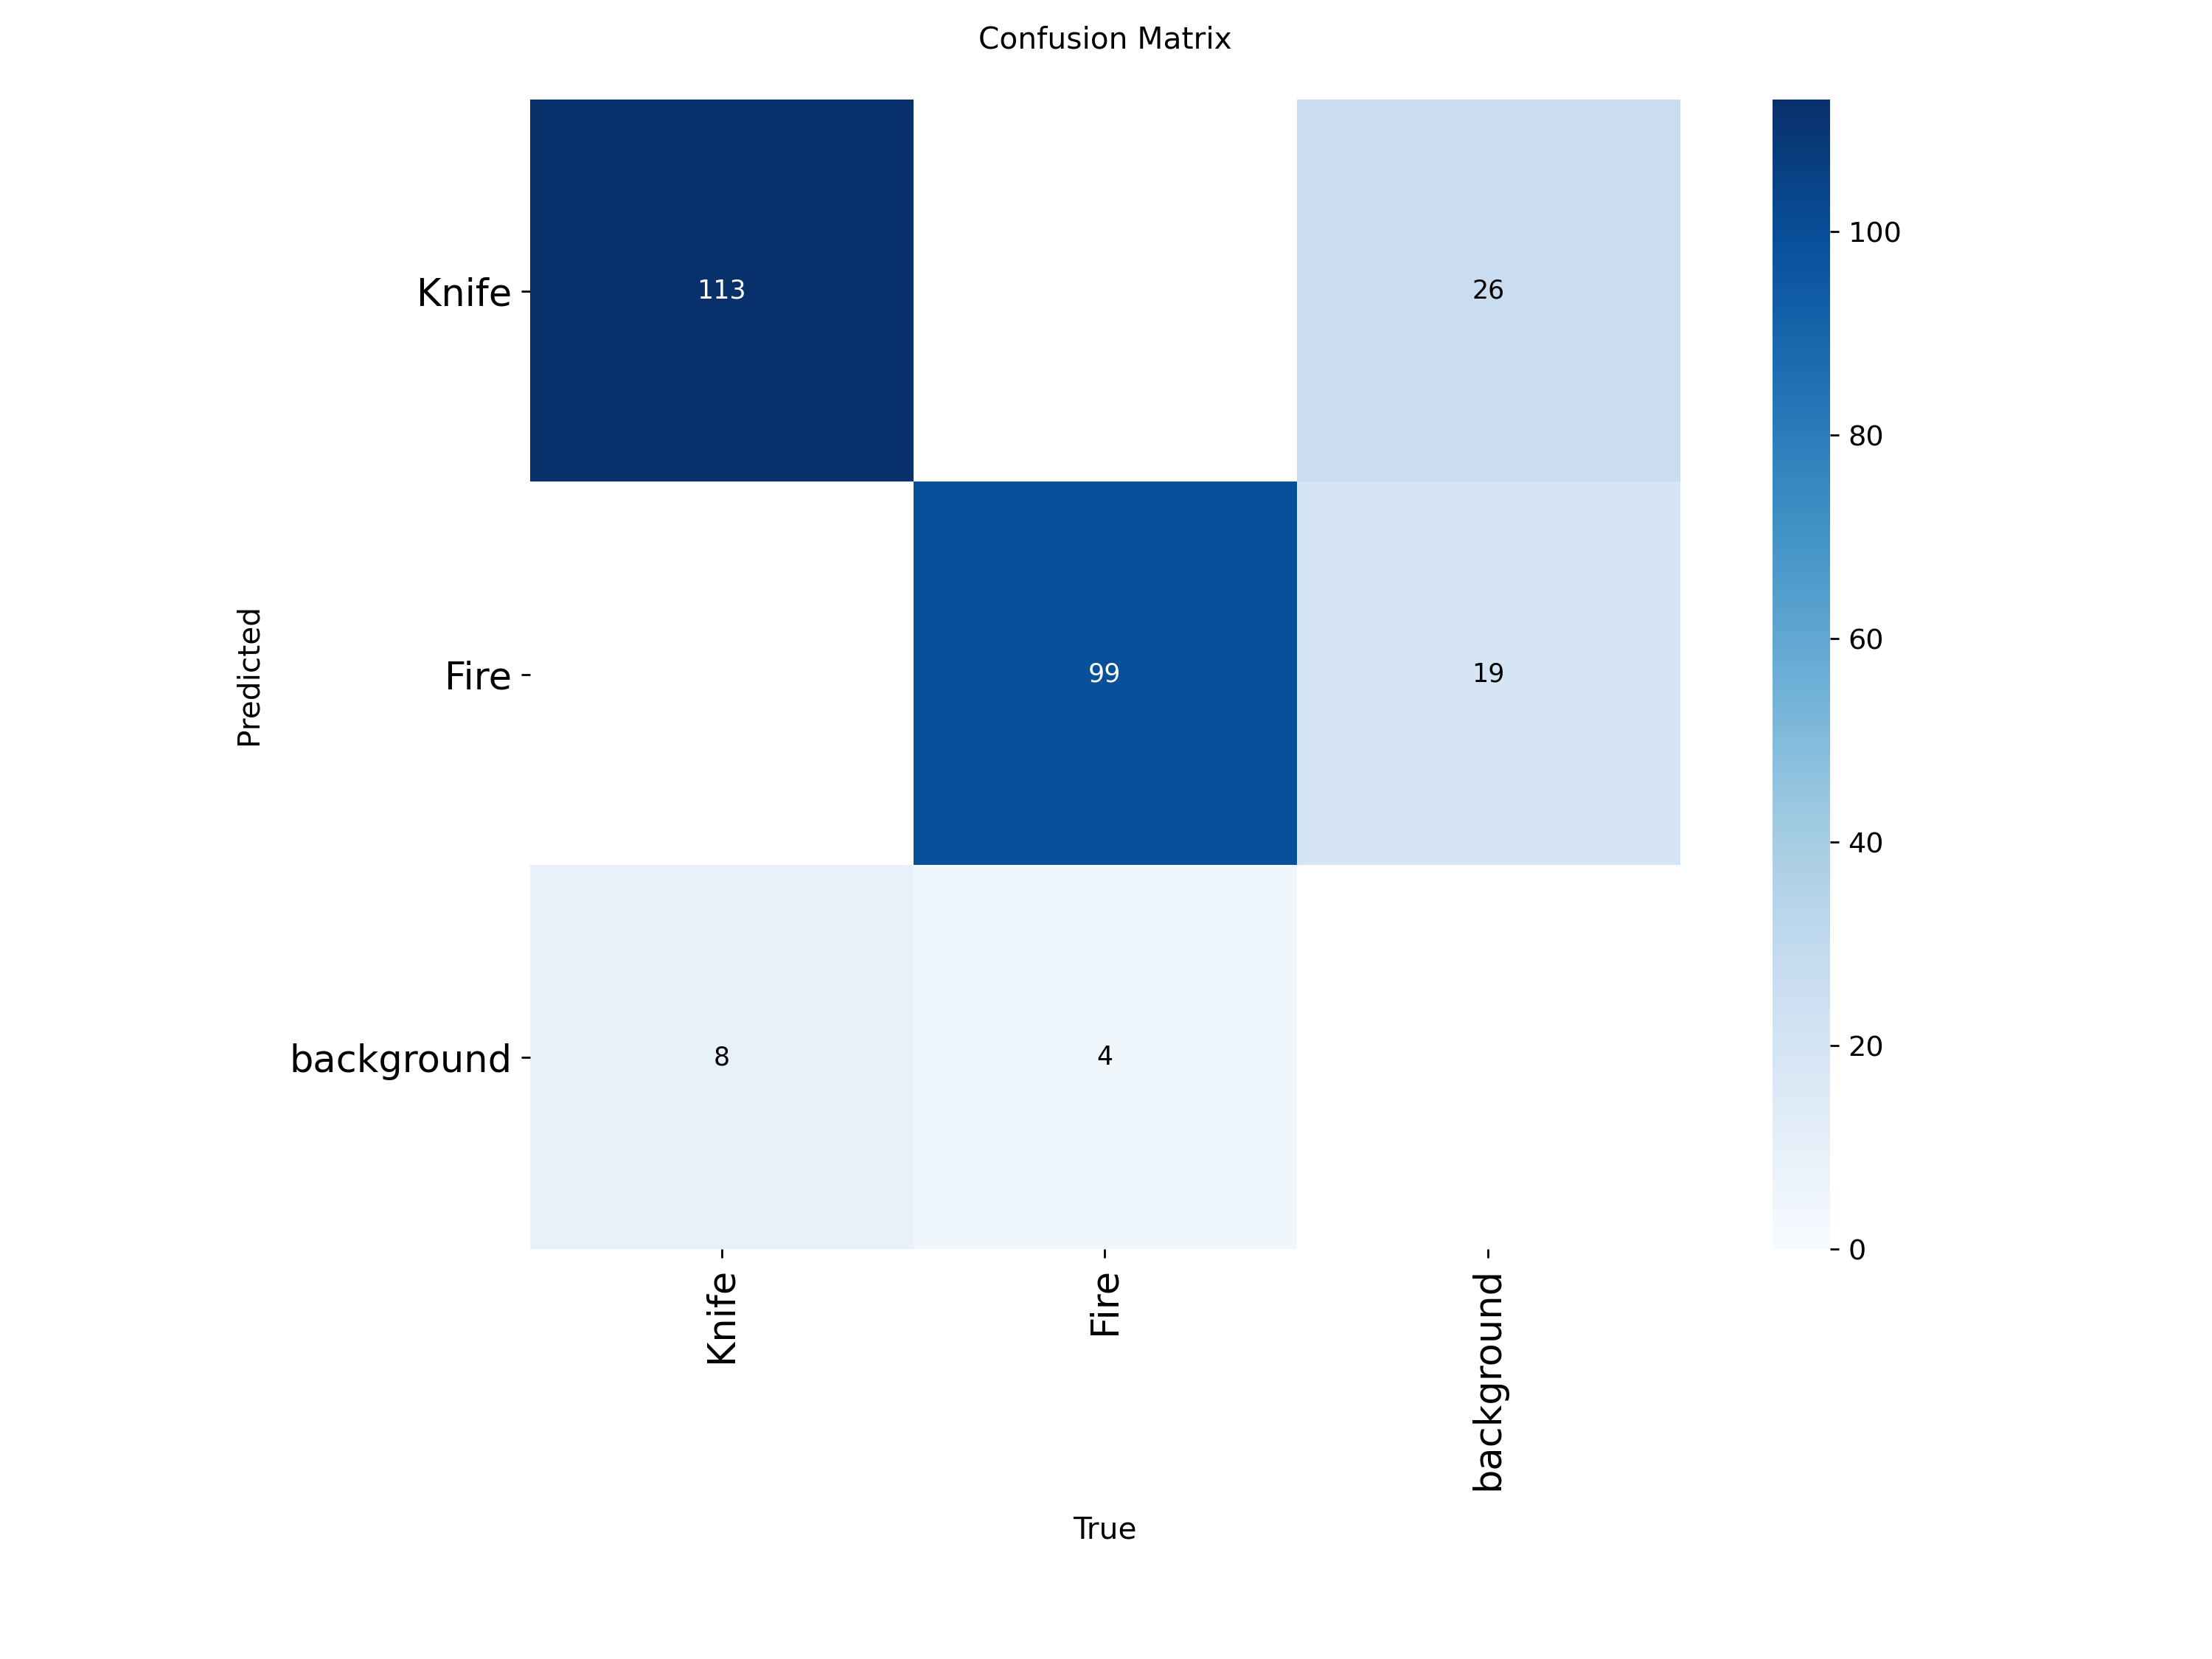
Overall, the best results were achieved for ‘knife’, ‘scissors’, and ‘fire’. The other classes had serious issues with a background (something wich could be improved by hard negative classes, but we focused more on the detection classes). Based on these results, subsequent training runs focused on representatives of each threat, meaning knife and fire.
In subsequent training runs, the training configuration was expanded and more knife data was used. In particular, the following augmentation techniques were introduced:
- brightness and lighting variations
- geometric transformations
- horizontal and vertical mirroring, where applicable
- mosaic augmentation.
These augmentations significantly improved the detection of knives from different angles, orientations, and shapes. The model became more robust in the face of changes in object appearance and camera perspective, as can be seen from the prediction examples in the following figures.
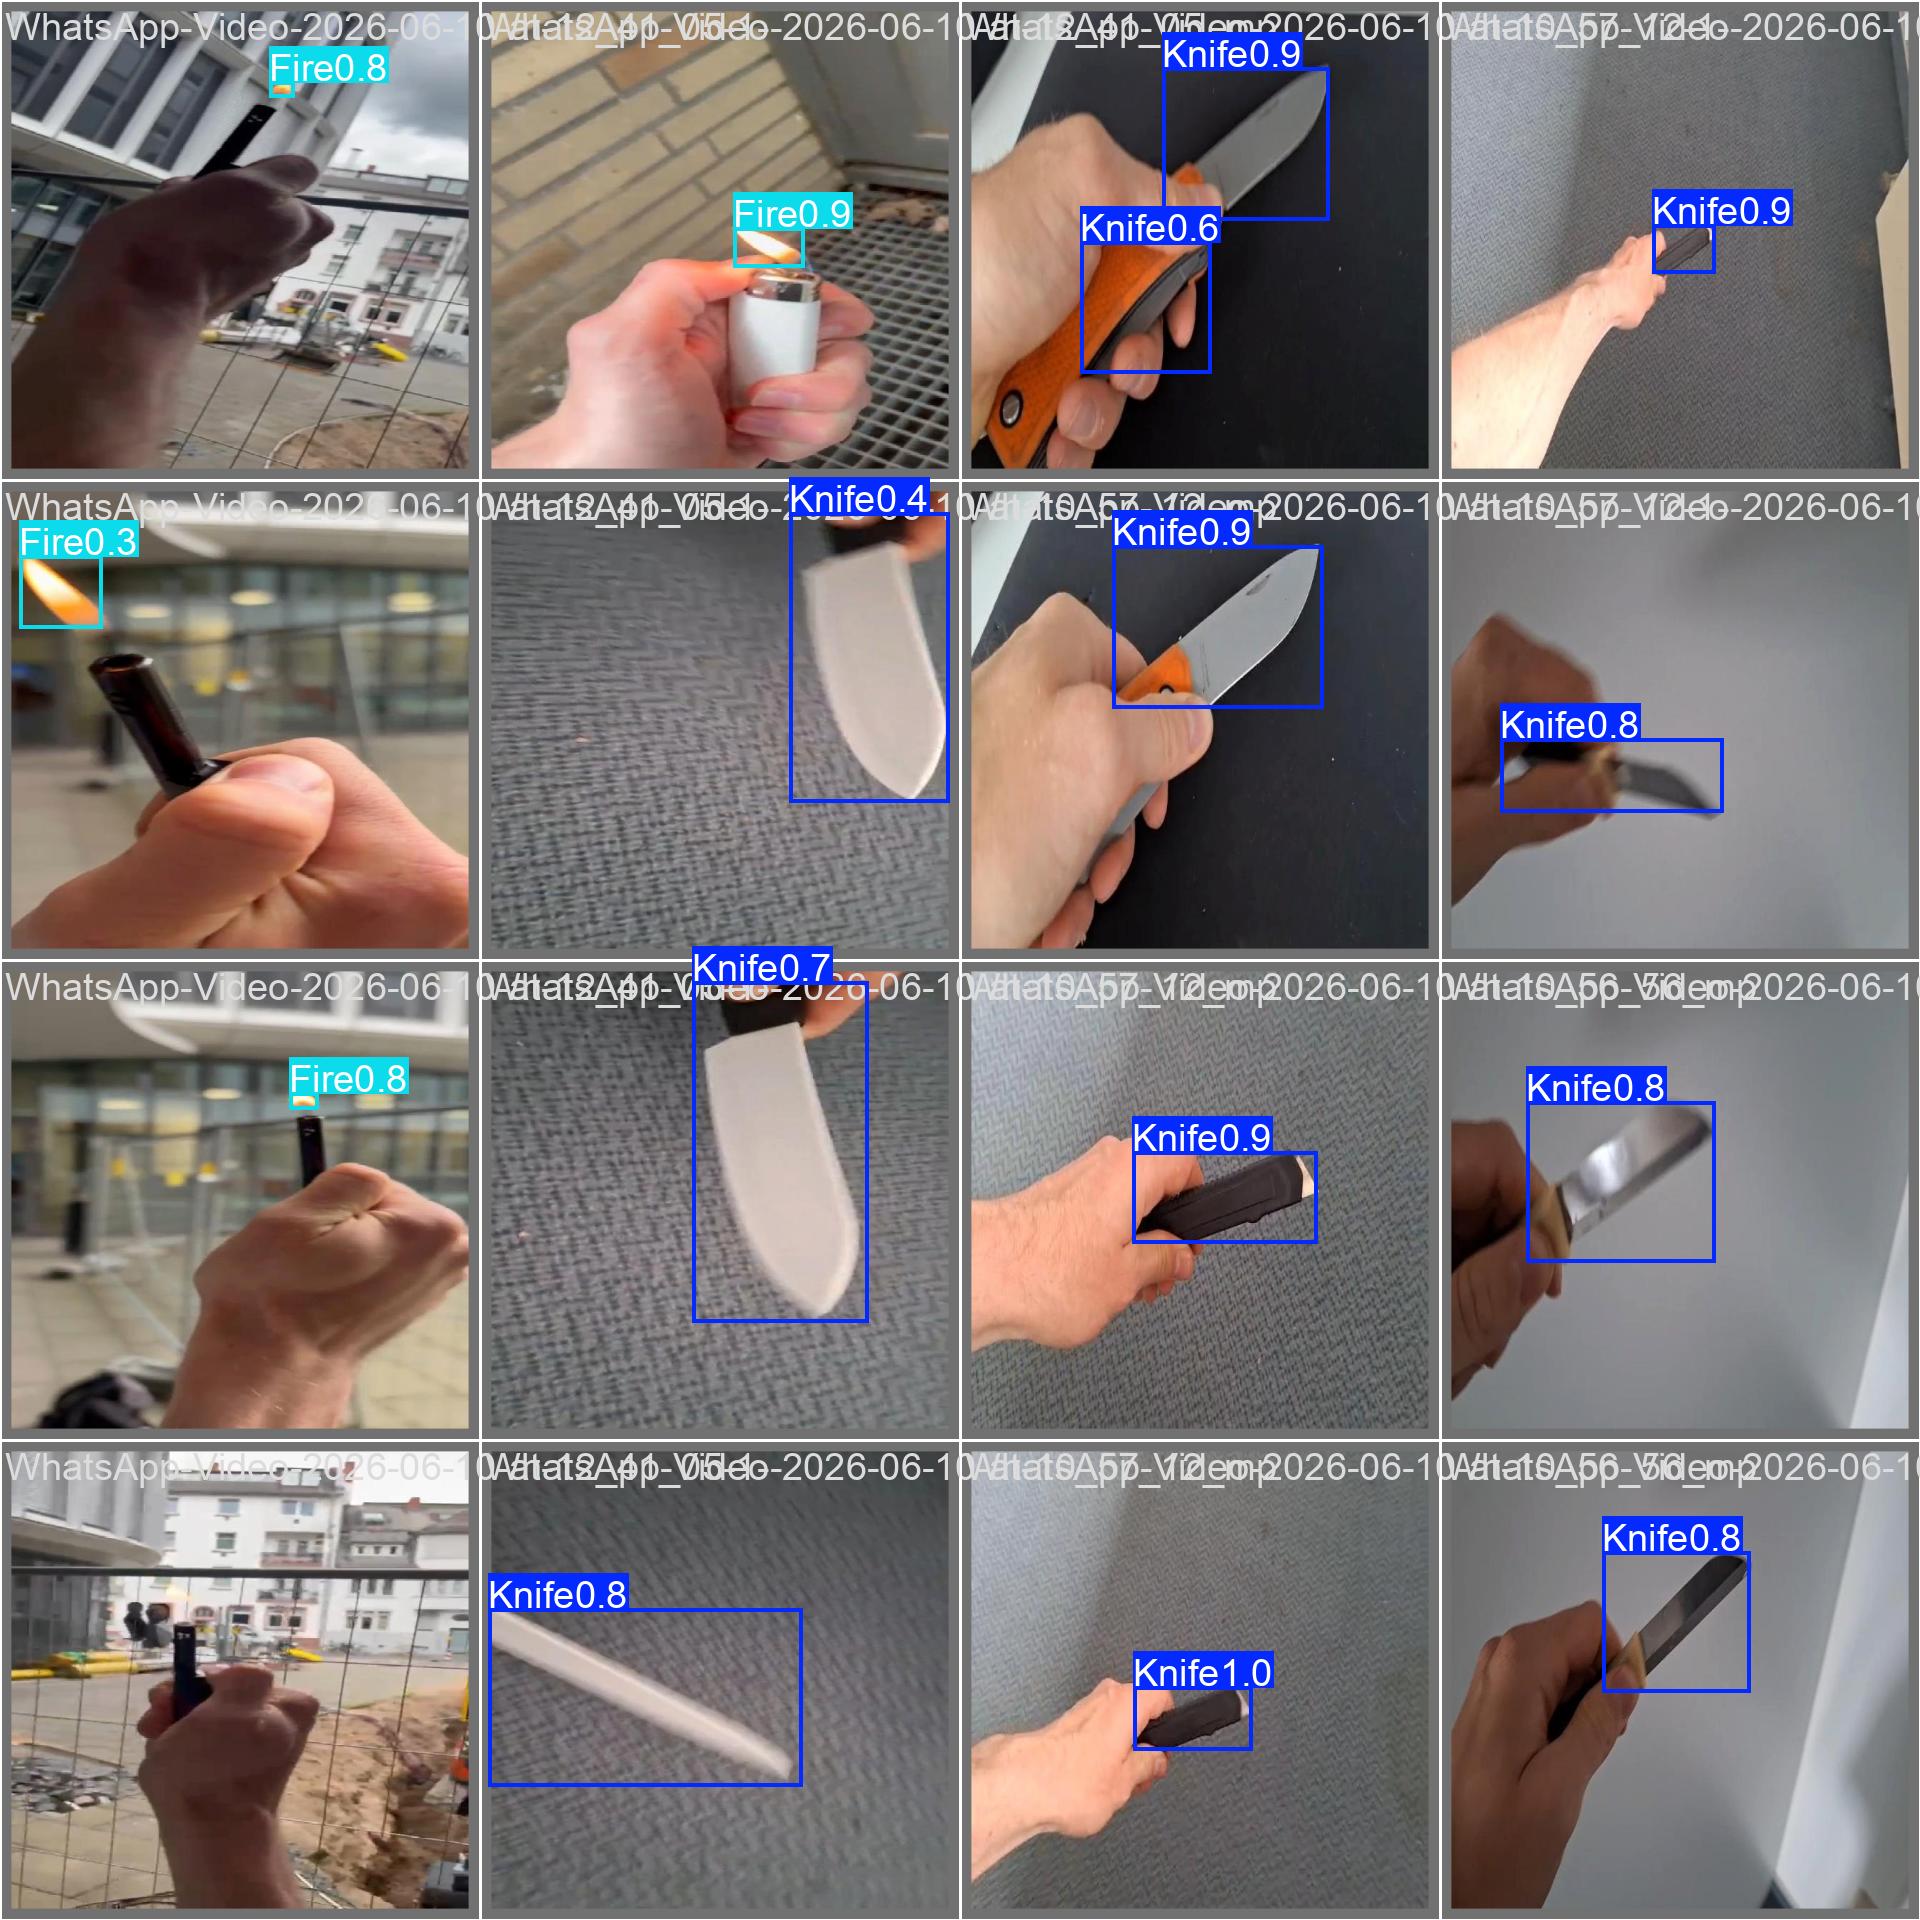
The overall detection results were more reliable, with very few false positives during testing. The main remaining weakness was the influence of the background, particularly as the annotation of a knife often included a lot of noise and background parts. However, the performance achieved was considered sufficient for the intended application, where the primary goal is the reliable, real-time detection of relevant threat objects. Which it does appropriate.
After the training, export the model to ONNX format, which is required for the AI HAT.
YOLO 11n Deployment on IMX500 AI Camera (Raspberry PI Setup)
After training, the .pt model must be converted into a format that can be deployed on the IMX500 Camera. This is done using the Sony Model Compression Toolkit (MCT).
Prerequisites
- Raspberry Pi 4B (8GB RAM) with a connected Raspberry Pi AI Camera featuring a Sony IMX500 sensor
- access to the Raspberry Pi
- Trained YOLO model v8n or v11n in .pt format (has to be as said in ultralytics doc)
- Calibration dataset
pt2imx (in Google Colab)
If you only install Ultralytics (as described in the official documentation), you may spend hours dealing with dependency conflicts, or you might be lucky and find the correct setup.
Thanks to this post Link the required dependencies are the following:
!pip install ultralytics
!pip install torch==2.3.1 torchvision==0.18.1 protobuf==7.35.0
NOTE: if you use Google Colab, downgrade the python version by changing the runtime to 2026.07 (Python 3.12).
The IMX500 conversion requires representative images for model calibration. These images are used to determine suitable ranges when converting the neural network to a more efficient representation for inference on the IMX500. We reduced our dataset to a calibration dataset of 10 images. We had good results with 10 images, although the log recommends using more than 300 images. Unfortunately, for this amount the code execution freezes.
After finishing the conversion, several files are generated:
yolo11n_imx_model
├── dnnParams.xml                                 # neural network params by IMX500 software stack
├── labels.txt                                    # class names
├── packerOut.zip                                 # deployment package with compiled model and required data for IMX500
├── model_imx.onnx                                # onnx version of model used during IMX500 conversion
├── model_imx_MemoryReport.json                   # info about model's memory requirements and resource usage
└── model_imx.pbtxt                               # text-based description of model
Now we habe the relevant packetOut.zip and corresponding lables.txt needed by IMX500 camera. Copy the whole folder to the Raspberry Pi 4.
Raspberry Pi Setup (on the Pi, NOT in Colab)
Install Raspberry Pi OS. NOTE: 64-bit and Bookworm (Legacy) OS Lite for deployment, OS for dev
Update System and Install Firmware
sudo apt update && sudo apt full-upgrade -y
sudo apt install imx500-all
Optionally enable VNC (for GUI in dev)
sudo raspi-config
→ Interface Options → VNC Enable
create venv
python3 -m venv --system-site-packages imx500_venv #--ssp damit Zugriff auf imx-all und andere globals
source imx500_venv/bin/activate
deploy Sony firmware
pip install --upgrade pip
pip install git+https://github.com/SonySemiconductorSolutions/aitrios-rpi-application-module-library.git
test
rpicam-hello --version
Problem: libcamera 0.5.x → incompatible with newer modlib versions (libcamera 0.6+ → recommended). Therefore, some additional adjustments are required.
pip uninstall modlib -y
pip install modlib==1.1.0
Instead of upgrading libcamera, downgrade modlib
Copy the model package to the Pi.
wget <your github>
unzip 11n_imx.zip -d 11n_imx_model
Adapt the standard YOLO Inference Script with the packageOut.zip and labels.txt.
class YOLO(Model):

    def __init__(self):
        super().__init__(
            model_file="11n_imx_model/packerOut.zip",         <--------------
            model_type=MODEL_TYPE.CONVERTED,
            color_format=COLOR_FORMAT.RGB,
            preserve_aspect_ratio=False,
        )

        self.labels = np.genfromtxt(
            "11n_imx_model/labels.txt",                       <---------------
            dtype=str,
            delimiter="\n",
        )

    def post_process(self, output_tensors):
        return pp_od_yolo_ultralytics(output_tensors)


device = AiCamera(frame_rate=16)  #eventuell auf 8 runter
model = YOLO()
device.deploy(model)

annotator = Annotator()

with device as stream:
    for frame in stream:

        detections = frame.detections[
            frame.detections.confidence > 0.55
        ]

        labels = [
            f"{model.labels[class_id]}: {score:.2f}"
            for _, score, class_id, _ in detections
        ]

        annotator.annotate_boxes(
            frame,
            detections,
            labels=labels,
            alpha=0.3,
            corner_radius=10,
        )

        frame.display()
And run it!
python3 run_yolo.py
What we can see now is a blurry image with bounding boxes and labels. Also, the image is upside down because the camera was upside down.
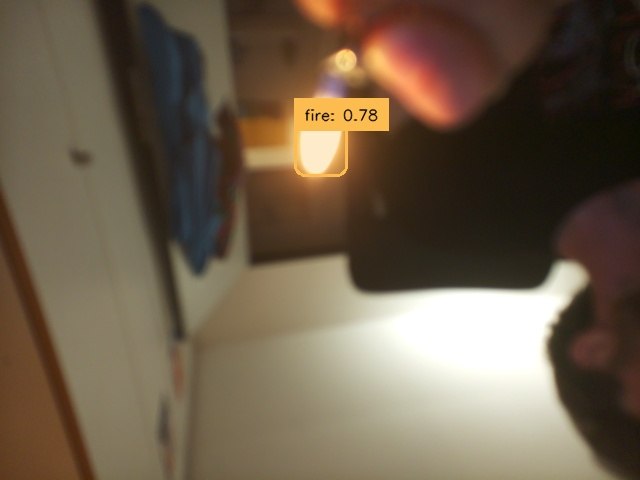
Overall, the IMX500 camera runs with set 8 FPS, needs about 60 ms for an inference per image, and the model size is about 14MB.
YOLO 11n Deployment on Pi AI Hat+ with Hailo8-Accelerator
Prerequisite
- Ubuntu 22.04 (or another x86 linux machine)
- trained YOLO Model (“best.onnx”)
- Raspberry Pi 5 with Hailo-8 or Hailo-8L AI Accelerator
Optional for Windows users using Windows Subsystem for Linux (WSL):
- Display available Linux systems:
wsl --list --online - Install Ubuntu 22.04 or use an existing version with wsl -d:
wsl --install -d Ubuntu-22.04 - Search and open the Ubuntu 22.04 app, the following may appear:
username@your-laptop:~$ - Update the system
sudo apt update
.onnx to .hef
Create and activate a virtual environment
python3 -m venv hailo_env
source hailo_env/bin/activate
Check Python version
python3 --version
Login and install the Hailo Dataflow Compiler from their developer zone: Hailo Software Downloads
- Depending on the Python version, select the appropriate compiler settings:
- Accelerators
- Hailo-8/8L
- AI Software Suite
- Dataflow Compiler
- x86
- Linux
- Example: Python 3.10
Copy the downloaded .whl file to the Linux home directory and install it.
pip install hailo-dataflow-compiler*.whl
Check Installation
hailo -h
Install Hailo Model Zoo
- for Raspberry Pi 5 with Hailo-8-Accelerator only older versions, like 2.19.0 can be used. Newer versions support Hailo-10 and later.
- Download the repository from: Hailo Model Zoo
Extract and copy the repository to the home directory and install it
cd hailo_model_zoo-2.19.0
pip install -e .
Compile ONNX Model to .hef
hailomz compile yolov11n \
    --ckpt best.onnx \
    --hw-arch hailo8l \
    --calib-path train/images \
    --classes 1 \
    --performance
| Parameter | Description |
|---|---|
--ckpt |
ONNX-Modell |
--hw-arch hailo8l |
Target hardware |
--calib-path |
Calibration images (64 prepared images) |
--classes |
Number of classes (7 classes) |
--performance |
Optimization for maximum performance |
Afterwards:
yolov11n.hef
fits.
For yolov8n this needs more steps, as the hailo installation has problems in detecting the yolov8n architecture correctly:
hailomz parse yolov8n \
    --ckpt best_.onnx \
    --hw-arch hailo8l \
    --start-node-names images \
    --end-node-names \
    /model.22/cv2.0/cv2.0.2/Conv \
    /model.22/cv3.0/cv3.0.2/Conv \
    /model.22/cv2.1/cv2.1.2/Conv \
    /model.22/cv3.1/cv3.1.2/Conv \
    /model.22/cv2.2/cv2.2.2/Conv \
    /model.22/cv3.2/cv3.2.2/Conv
Now optimize the model.
hailomz optimize yolov8n \
    --har yolov8n.har \
    --calib-path test/images \
    --classes 1
Compile and if works add –performance for further performance optimization.
hailomz compile yolov8n \
    --har yolov8n.har \
    --hw-arch hailo8l
The result should be the yolov8n.hef file.
Raspberry Pi Setup
Update the system
sudo apt update
sudo apt upgrade
Enable the PCIe speed in raspi configuration under Advanced Settings>PCI>Enable:
sudo raspi-config
Install and verify the Hailo Runtime. If the Hailo accelerator is detected successfully, continue.
sudo apt install hailo-all
hailortcli fw-control identify
- Load the Raspberry Pi example
git clone https://github.com/hailo-ai/hailo-apps.git cd hailo-apps ./install.sh source setup_env.sh - Navigate to the resources folder and add a label file with the labels.
cd ~/hailo-apps/resources/jsonfor example
{
  "detection_threshold": 0.5,
  "max_boxes": 200,
  "labels": [
      "Human"
  ]
}
Add in hailo-apps/hailo_apps/python/pipeline_apps/detection/detection.py:
from hailo_apps.python.core.common.telegram_handler import TelegramHandler
And expand user_app_callback_class
class user_app_callback_class(app_callback_class):
    def __init__(self):
        super().__init__()

        self.new_variable = 42

        self.telegram = TelegramHandler(
            token=os.environ.get("TELEGRAM_TOKEN"),
            chat_id=os.environ.get("TELEGRAM_CHAT_ID"),
        )

    def new_function(self):
        return "The meaning of life is: "
Now export token and id onto pi e.g., export TELEGRAM_TOKEN=””.
Then add to implement telegram notifications after the frame color conversion:
if user_data.telegram.should_send_notification(track_id):
    user_data.telegram.send_notification(
        name=detection.get_label(),
        global_id=track_id,
        confidence=confidence,
        frame=frame.copy,
    )
Add the .hef model and the labels as a JSON to the directory and run:
python3 hailo-apps/python/pipeline_apps/detection/detection.py \
    --hef-path <your path>/best.hef \
    --input usb \
    --labels-json <your path>.json \
    --use-frame
Unfortunately, when testing the decision, we only got black images by the setup, so we weren’t able to demonstrate the different performance.
Telegram Bot
- Download Telegram and search for @botfather.
- Write /newbot to BotFather and set bot name, in our case ObjektDetekt.
- Then set a public username.
- Then you receive the token. Note this token and open the api: https://api.telegram.org/bot
/getUpdates - When you now write to the bot, you see the corresponding chat id. Note this chat id (e.f. of a group or private chat)
- Use token and chat id in send_telegram() to let bot send alerts.